All times are UTC


It is currently Fri Nov 15, 2024 1:41 pm


Post new topic Reply to topic  [ 815 posts ]  Go to page Previous  1 ... 4, 5, 6, 7, 8, 9, 10 ... 41  Next
Author Message
 Post subject:
PostPosted: Tue Jul 13, 2010 10:09 pm 
Kinsman
Kinsman
Offline

Joined: Wed Jun 16, 2010 6:13 pm
Posts: 71
Location: UK
I think your problem here is the origional walls are several feet thick and trying to represent that in miniature is difficult. From what i have seen the model railway guys either live with it or somehow paint it to represent it.

I suppose you also have to remember the sort of distance your scenery is being viewed from/

_________________
www.ohmodels.co.uk - My buisness
Top
  Profile  
Reply with quote  
 Post subject:
PostPosted: Wed Jul 14, 2010 8:22 am 
Craftsman
Craftsman
User avatar
Offline

Joined: Sat Nov 01, 2008 3:10 pm
Posts: 490
Location: Opende,Groningen,Netherlands
Images: 4
It looks good but I have to agree with old man willow. :)
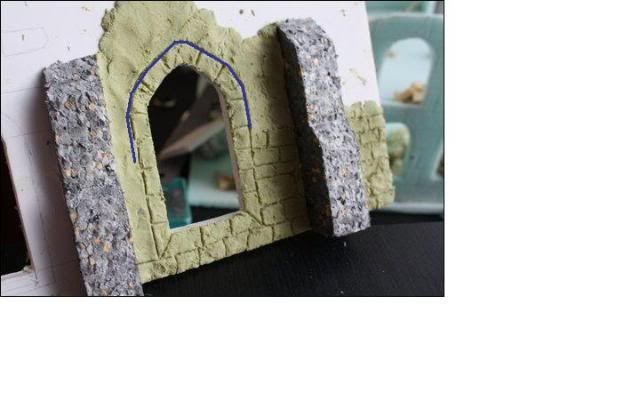
Perhaps if you make the blue part a bit higher (just like polarbird2's picture) you can make it look even better.
Image

Btw did you use a metal or a plastic tool on the crack filler as I find plastick much easier to work with. (the metal ones stick to the filler far to much and that gives the result you got).
Sorry for forgetting to say this earlier :oops:

Looking forward to the next update

_________________
“People often claim to hunger for truth, but seldom like the taste when it's served up.”
My wip
Top
  Profile  
Reply with quote  
 Post subject:
PostPosted: Wed Jul 14, 2010 8:41 am 
Administrator
Administrator
User avatar
Offline

Joined: Thu Jan 08, 2004 11:59 pm
Posts: 2780
Location: Adelaide
Images: 15
Well, I have to say, you are achieving some great results here. Terrain is a subject close to my heart and I'd like to offer some suggestions for getting a realistic effect with your windows.

If you've read any of my old articles, you'd know I use Polyfilla (spackle) for most of my stone texture work. I use this material for a number of reasons, but one in particular has relevance to what you're trying to do.

Polyfilla can be sanded smooth when it's dry, which is perfect for achieving the look of dressed stone around an ornamental window (see @polarbird2's images). It can also be carved and scribed, which means you can do the mortar joins in the masonry too.

So you can get the effect of dressed stone surroundings very neatly with just a little piece of sandpaper - something that is that much harder with milliput or green-stuff. Cheaper too.

_________________
Dagster
Top
  Profile  
Reply with quote  
 Post subject:
PostPosted: Wed Jul 14, 2010 3:17 pm 
Loremaster
Loremaster
User avatar
Offline

Joined: Sat Sep 19, 2009 8:57 am
Posts: 1223
@Dagorlad; I like the idea of using polyfilla, & I have some in the house now. So I'll give it a try. It's always a pleasure to have a post from the big scenery makers :D

@Aqan/Polar yep I'll give the windows a try, I'm afraid all i had time for the moment was to finish of the brick work.

Here's what I've achieved today
Image
Image
Top
  Profile  
Reply with quote  
 Post subject:
PostPosted: Thu Jul 15, 2010 4:20 pm 
Elven Warrior
Elven Warrior
Offline

Joined: Wed Mar 11, 2009 11:38 pm
Posts: 647
Location: Stealing something from your fridge
:shock:

Lovely job on the wall! For a minute there I thought Dagorlad had hijacked your thread and posted pics of his work :rofl:

_________________
Hmm... what would a chair look like if your knees bent the other way?
Top
  Profile  
Reply with quote  
 Post subject:
PostPosted: Fri Jul 16, 2010 11:07 am 
Elven Elder
Elven Elder
User avatar
Offline

Joined: Mon Jul 27, 2009 5:57 pm
Posts: 2760
Location: Belgium, Aalst
nice job on the wall. I like it, it looks great. :) Those windows are made well to :-D

_________________
goblin: "people associate me with boogers because i am green"
Top
  Profile  
Reply with quote  
 Post subject: **Update**
PostPosted: Sat Jul 17, 2010 7:25 pm 
Loremaster
Loremaster
User avatar
Offline

Joined: Sat Sep 19, 2009 8:57 am
Posts: 1223
Here's an Update of what I've done lately, nothing impressive but the mold thing takes up a lot of time. I used the pollyfilla thing for the sticking out bits, worked rather well - but would be a lot easier on a flat surface. Thanks Dagorlad

Image
Image
Image
Image

C&C's Welcome :D
Top
  Profile  
Reply with quote  
 Post subject:
PostPosted: Sat Jul 17, 2010 7:49 pm 
Elven Warrior
Elven Warrior
User avatar
Offline

Joined: Mon Mar 15, 2010 11:38 pm
Posts: 584
Location: Fighting a Balrog on some mountain.
Images: 8
Looking good man. i wish I had the space to make more terrain projects, they are so much fun. :yay:

_________________
http://noddwyr.wordpress.com
Top
  Profile  
Reply with quote  
 Post subject: looks good so far
PostPosted: Sat Jul 17, 2010 8:27 pm 
Elven Elder
Elven Elder
User avatar
Offline

Joined: Thu Apr 01, 2010 11:33 pm
Posts: 3688
Location: Atlanta GA. U.S.A.
Images: 14
Did you decide to use cheese cloth to make the mold stronger?
Did the product you are using recommend 3 or more coats?

Judging from the windows great care will be needed to remove the casting with out breakage. I think you can avoid most of this by making the back up support mold in several pieces. The casting will still be seamless. When you build the back up box make it about 1/2 of an inch taller than the buttress. Make a small thin card for each of the buttresses. This will look like the expansion joint for a concrete drive way. Pour the box. When the cast is dry remove the box. The back up will be in several parts but this will keep the latex from stretching out of shape. It will be much easier to remove the castings from the backup mold if you do it this way. The latex will stretch like a sock when you pull it off.

If you have already realized this forgive me. If not, glad to help.

_________________
"the same as a duck you must be made of wood"
Top
  Profile  
Reply with quote  
 Post subject:
PostPosted: Sat Jul 17, 2010 8:36 pm 
Elven Warrior
Elven Warrior
Offline

Joined: Wed Mar 11, 2009 11:38 pm
Posts: 647
Location: Stealing something from your fridge
Lovely work 8)

I always use Polyfilla for stone texturing, and definetly agree that it's hard to apply it smoothly and evenly on non-flat surfaces. You seem to have done pretty well with the supports, however, so good job.

Update soon! :)

_________________
Hmm... what would a chair look like if your knees bent the other way?
Top
  Profile  
Reply with quote  
 Post subject:
PostPosted: Sat Jul 17, 2010 8:39 pm 
Loremaster
Loremaster
User avatar
Offline

Joined: Sat Sep 19, 2009 8:57 am
Posts: 1223
Well what i decided to do was first give it a few coats of latex (that's only 3 in the picture above) Once I have that thick enough I will construct a square around it, and add plaster to strengthen the mold.
I didn't quite understand what you meant with the card/window & all.. could you please describe it to me in more detail?
Yes I know I am very special & sometimes slow at times :oops:

Thank's Again
Drum
Top
  Profile  
Reply with quote  
 Post subject:
PostPosted: Sat Jul 17, 2010 8:50 pm 
Kinsman
Kinsman
Offline

Joined: Fri Jul 09, 2010 9:03 pm
Posts: 131
Location: Scotland
ohh yes you can be very special and VERY slow at times, yes :P

believe me guys, its REALLY hard to explain something to him some of the time :lol:

_________________
life is a waste of time
time is a waste of life
get wasted all the time and
you'll have the time of your life
Top
  Profile  
Reply with quote  
 Post subject:
PostPosted: Sat Jul 17, 2010 10:01 pm 
Elven Elder
Elven Elder
User avatar
Offline

Joined: Thu Apr 01, 2010 11:33 pm
Posts: 3688
Location: Atlanta GA. U.S.A.
Images: 14
I didn't quite understand what you meant with the card/window & all.. could you please describe it to me in more detail?
Sure I am glad to help.
The buttresses are deeper than the rest of the wall. The back up casting support mold will be very tight. When you try to remove the back up from the mold it will stick. The casting will break at the point the thin wall joins the buttress. The card will split the back up into 4 parts. There will be a right and left side of each buttress on the back up so it can't stick.

Image

I hope you can see this. I rapped a piece of card a round a block of wood to make a quick box. I use two small pieces of wood to show what I mean. See how this would break the cast box into three parts.

Image

This photo shows how thin the latex can be. The simple shape of the hay stack is no problem to pull from its back up .These are 15mm and 25mm for ACW.
You can see from this photo how important the plaster back up molds are to keep the thin molds from stretching out of shape.I would use a piece of card for the center of each buttress. 4 pieces will support the latex as well as one. They are not any more difficult to make. The mold can not get stuck and break the casting.

_________________
"the same as a duck you must be made of wood"
Top
  Profile  
Reply with quote  
 Post subject:
PostPosted: Sat Jul 17, 2010 10:51 pm 
Loremaster
Loremaster
User avatar
Offline

Joined: Sat Sep 19, 2009 8:57 am
Posts: 1223
oh yes I understand you now. Sorry about that. Thanks again for the great advise, I think you could make some great articles with the knowledge you have. I would love to be as experienced as you some time :D 8)
Top
  Profile  
Reply with quote  
 Post subject: That will take a little time
PostPosted: Sun Jul 18, 2010 4:15 am 
Elven Elder
Elven Elder
User avatar
Offline

Joined: Thu Apr 01, 2010 11:33 pm
Posts: 3688
Location: Atlanta GA. U.S.A.
Images: 14
Quote:
I would love to be as experienced as you


Thank you, Experience comes with time. It won't be that long before you have the experience to give expert advice.

I think your project will make a good article. Take lots of photos.

_________________
"the same as a duck you must be made of wood"
Top
  Profile  
Reply with quote  
 Post subject: Thanks for the comments in the gallery.
PostPosted: Sun Jul 18, 2010 12:16 pm 
Elven Elder
Elven Elder
User avatar
Offline

Joined: Thu Apr 01, 2010 11:33 pm
Posts: 3688
Location: Atlanta GA. U.S.A.
Images: 14
Thanks for the comments in the gallery. I did not build that one. The fortress was commissioned by a late business partner. Tim signed it and dated it 4/16/98. See the link to his web site: http://www.modelcastles.biz/

_________________
"the same as a duck you must be made of wood"
Top
  Profile  
Reply with quote  
 Post subject:
PostPosted: Sun Jul 18, 2010 3:36 pm 
Loremaster
Loremaster
User avatar
Offline

Joined: Sat Sep 19, 2009 8:57 am
Posts: 1223
oh yes I've seen that site before, some interestin models there. Even though you may not have built that one, I looked around in your gallery and your work is inspriring, and you have so much attention to detail.
Top
  Profile  
Reply with quote  
 Post subject:
PostPosted: Sun Jul 18, 2010 5:23 pm 
Loremaster
Loremaster
User avatar
Offline

Joined: Mon Aug 21, 2006 12:53 pm
Posts: 1827
Location: CO, USA
@ Drumtastic - sorry for the late post on this question. I thought I asked it a while ago but...

About how heavy is your Helms Deep main structure? I was wondering how easy it is for you to transport ( one or two person lift? ).

_________________
Wait ye the finish! The fight is not yours.
Beowulf

http://TacticsInMiniature.com
Top
  Profile  
Reply with quote  
 Post subject:
PostPosted: Sun Jul 18, 2010 6:07 pm 
Loremaster
Loremaster
User avatar
Offline

Joined: Sat Sep 19, 2009 8:57 am
Posts: 1223
Beowulf03809 wrote:
@ Drumtastic - sorry for the late post on this question. I thought I asked it a while ago but...

About how heavy is your Helms Deep main structure? I was wondering how easy it is for you to transport ( one or two person lift? ).


Oh sorry I must have missed that question, I should need to finish it soon anyway, so there'll be an update soon on it. It weights ruffly 1kg, thats just a guess really. Well it is possible for one person to hold it, it's just akward because it's so big & tall. Doors are a problem, at the start mine didn't fit through the door, so we took it out the window (one of these large sliding doors) We trimmed it off so that it then fitted through the door.
I will be taking it to my local Warhammer club soon, there are around 6-7 Lord Of The Ring players so it's rather fun to have a massive battle.
Top
  Profile  
Reply with quote  
 Post subject: Aragon
PostPosted: Sun Jul 18, 2010 6:31 pm 
Loremaster
Loremaster
User avatar
Offline

Joined: Sat Sep 19, 2009 8:57 am
Posts: 1223
Well recently over this past year I've found no desire to paint my men at all.. but after having my firs match in quite some time i got straight back into it. My painting skills.. ... well.. .. should improve over time hopefully. Plnety of feedback on this one would help me to improve on my painting, for I'm not a confident painter

Image
Image

C&C's Welcome
Top
  Profile  
Reply with quote  
Display posts from previous:  Sort by  
Post new topic Reply to topic  [ 815 posts ]  Go to page Previous  1 ... 4, 5, 6, 7, 8, 9, 10 ... 41  Next

All times are UTC


Who is online

Users browsing this forum: No registered users and 106 guests


You cannot post new topics in this forum
You cannot reply to topics in this forum
You cannot edit your posts in this forum
You cannot delete your posts in this forum
You cannot post attachments in this forum

Search for:
Jump to: