All times are UTC


It is currently Sat Sep 21, 2024 10:40 am


Post new topic Reply to topic  [ 17 posts ] 
Author Message
 Post subject: The One Ring Adventure Campaign: Strategic map
PostPosted: Wed Sep 03, 2008 11:30 pm 
Craftsman
Craftsman
User avatar
Offline

Joined: Tue May 27, 2008 7:19 am
Posts: 311
[h2][center][h1]The One Ring Adventure Campaign[/h1][/center][/h2]

[center]Based on feed-backs I recommend that you go for the test game first to get the feel of the game then you can go through mechanics and game play rules.

Jump to the Test Game Post:
http://www.one-ring.co.uk/phpBB2/viewto ... 146#141146
[/center]

[h2][center]Game Objectives[/center][/h2]
[spoiler]Main objective is to work as Stratigic Map (an interface) to the LOTR SBG games through out the war of the ring, with the possibility to pick your own path, strategies, battles that you think better serve the ultimate goal of Destroying/Regaining the One Ring and Defeating your foes. Trying to allow the player to rewrite his own version of Lord of The Rings journey and adventure.

[h2]How to win the game?[/h2]
By enough Victory Points (VP): collecting points from acheiving different minor objectives (Either sides)
Acheiving Major Objective:
- Killing/Corrupting Ring Bearer or kidnapping him to Orthanc or Barad-Dur (Shadow Ring Win)
- Destroying the ring (Good Ring Win)
- Capturing Rohan and Gondor (Shadow Political Win)
- Capturing Orthanc and Barad-Dur (Good Political Win)

If both sides acheived one or more of the objectives by end of the same turn the game is a draw.

Note: I tried to keep dice rolling to the minimum and give more space for players to enforce their own strategy away from the influence of ladyluck, and hope it worked. [/spoiler]

[h2][center]Game Mechanics[/center][/h2]
[h2][center][h3]1- Stages[/h3][/center][/h2]
[spoiler]This mechanic is primarily for controlling the game's pace and keep the soul of the adventure and storyline, but in the same time also giving space to lots of variations and creativity. Map is divided into 4 Stages (Stage 1 to the far left, Stage 4 to the far right of the ME map), each with different type and specific rules and limitations (Time Attack: Time is against good people, so each stage has a max number of turns for fellowship to pass, otherwise good player takes penalties which certainly means more advantages to the shadow side). Standard stacking limits successively are (Level 1)500, (Level 2)750, (Level 3)1000 but it's really down to what players may agree on, may be more may be less. Stronghold regions have the stack limit of 1500, only 1000 of them can be inside fortifications and the rest are fighting in battlefield (A special deployment area or reinforcement rule can be applied if players like and agree). Armies won't be put on the table directly, but only Named Heroes, points and Nation's names will be assigned to regions (e.g. One region may contain Faramir's model, 450pts Gondor, and 150pts Feifdoms. This force later may move all or partially to join force with a Rohan army led by eomer in another region as long as stacking limit allows...). Then if battle esues in certain region, each side can decide which forces of the designated nation and within points he wants to battle with, challenging how quickly can you form a good list 8)

[h2]** Stages Borders:[/h2]
The map here is the ME map of course.

Stage 1:From the Left edge of the map to Bree. (Bree is inside this Stage)
Stage 2:From Stage 1 border to the line from the top of the map to Carn Dum, and running along the left edge of the Misty Mountains (Moria's Gate is inside this stage and should be unlocked by password - die roll - if Fellowship wishes to pass though it to the next stage)
Stage 3:From Stage 2 border to the line from the top of the map and running along Merkwood Froest's left border (Folding in Dol Guldor), then down in a straight line running through Tol Brandir to the bottom of the map. Following the line of the river from the north, but border takes a straight vertical down from Tol Brandir right down to the bottom edge of the map. This means that the coasts of Pelargir, South Gondor and Harad (Including the Corsairs of Umbar haven!!) are inside this stage.
Stage 4:The rest of the map to the right edge. (Including Minas Tirith, Druadan Forest, Losarnach, and of course Osgiliath).

Image

[h2]** Stages Types:[/h2]
Current Stage: Stage 1 at the start of the game is the Current Stage, and the last one that FSP unlocks afterwards.
Past Stage: All stages to the left of the Current one (They have almost the same characteristic as the current stage)
Active Stage: The one directly to the right of the Current one.
Inactive Stage: All stages to the right of the active one.

[h2]** Stages Characteristics:[/h2]
Inactive Stage:
....1) Movement/Attack: only inside own Nation's, and Allied Nations' Borders if possible.
....2) Expand/Shrik: Possible
....3) Deployment: Stacking limit is of Level 1.
....4) Trap: Playable (Nazguls are the only units abroad only in stage 1&2 after that they are restricted to Stage rules)
....5) Lidless Eye: Still Far Away
Active Stage: same as Inactive + the following:
....1) Movement/Attack: neutral regions are allowed too.
....2) Deployment: Stacking limit is of Level 2.
....3) Lidless Eye: possible,only in Stage 3 and 4.
Current and Past: Anything is possible, and Stacking limit is of level 3. Past regions has only a stacking limit of Level 2, and also Lidless eye can't reach beyond Stage 3.

Note: Units can't move across Stages borders (, except between Current and Past (both ways) or between Past ones. And only Fellowship can unlock Active Stage to become Current. And though Nations can still expand/shirnk borders across Stage borders, but with units may not be able to reach new claimed region yet respecting Stages rules.
[/spoiler]
[h2][center][h3]2- Cards[/h3][/center][/h2]
[spoiler]130 Cards each side in 2 categories (2 Deck). Ring Hunting Deck (40), and Political Deck (100). 8 cards per hand, reconcilable according to Reconcile Chart. Shadow starts with 5Political+2Ring hand mix, while good player starts with 1Political+7Ring hand mix. Cards should go to the discard pile of its type when used then later gets reshuffled when correspondant drawing deck gets empty. You can play as many cards as your Action Pool can cover their actions' costs. Sides will interchange playing cards at the beginning of each phase then go on with non-cards actions (like moving Fellowship/Nazgulls...) if applicable.

The side with more Action Points (see Action Pool section later on) always playing cards first and less AP always has the choice to pass.

At the end of each turn (end of End Phase) a player can discard 1 card from his hand without executing effect or paying AP to help cycling.

[h2]** Political Cards Types (war, peace, territory and deceipt)[/h2]
Move/Attack (armies/single hero)
Expand (Nation's Conrol [borders])
Shrink (Nation's Control [borders])
Deployment [Points/Certain warrior(s) or Hero(s)]

[h2]** Ring Hunting Cards Types: (FSP journey and plots against it)[/h2]
Trap Enhancement (Nazguls/Agents)
Escape trap
Add Burden
Heal Burden
Enhance Nazgul movement
Enhance Fellowship movement
Lidless Eye (Heavy Burden)

[h2]** Action Pool Effects: (See Action Pool section later on)[/h2]
Cost Modifiers: In some cards of both decks you may find that you can perform an action with less/more AP cost than standard. Or simply some event that stretches/tightens your opponent's Action Pool, though few of that last type.

[h2]** Reconcile Chart:[/h2]
Every turn starts with reconciling your hand. Count the cards in your hand and reconcile them to 8 (discard down to 8 if needed). According to how many cards you may want to draw up to 8, follow the following rules.

1 card: Draw it from deck as most cards in your hand.
2/4 cards: draw equally.
3 cards: one more from the deck as most cards in your hand.
5 cards: 4 equally, and roll a die for the fifth, on a 4+ draw from deck as most cards in your hand.
6 cards: If equal cards types in your hand (or none) draw equally. If not, draw 4 equally and roll 2 dice for 5th and 6th with 4+ means a card from deck with most cards in your hand.
7th/8th: always player's choice.[/spoiler]

[h2][center][h3]3- Action Pool[/h3][/center][/h2]
[spoiler]A player has Action Points (AP) in Action Pool equal to number of cards in type with most cards in your hand. (e.g. if you have 5P+3R, then you have 5 points in action pool). You use your AP to perform actions.

Note: A separate FSP member in a Freeps capital adds 1 AP to the action pool every turn as long as he stays there. A group of them in the same Capital add only 1 too. (Remember a Hero becomes a FSP member only when he joins FSP for at least 1 turn)

[h2]Actions Costs[/h2]
Each type of actions consumes 1AP, Excpet:

Movement as follows:
- Single warrior=1AP
- Army (Even if include a Named Hero)="Level of the army+1"
- Fellowship=3 (2 If there is a guide in the Fellowship - Gandald, Aragorn, or Gollum)
- Named Hero (Both sides)="1AP to move 2 Heroes" (separate or together), except that 1AP can move 3 Nazguls.

Deployment: Differs from Stage Type to Another according to the Deployment Chart.

[h2]Deployment Chart[/h2]
This is to illustrate the pressure of time on each side. The Good side is racing against time not to give Evil side any more chance to easily prepare his forces that he already began to summon it, while the Evil side working on his own plans steadily at first, but soon he'll find out that he underestimated the threat Good people are throwing at him.

Good Chart: 1/2/3/3 are the standard cost of deployment in the four stages from left to right (e.g. stage 3 will cost 3AP to deploy in). As Current Stage moves forward the cost also moves with it, so if Stage 2 becomes the current stage, the cost chart becomes 3/1/2/3. Notice the 3 that sweaps in from the left. And 3s will continue to sweap in from the left, so when the Current Stage becomes the Stage 3 the deployment chart becomes 3/3/1/2 and so on.
Evil Chart: 3/2/2/1 are the standard cost of deployment in the four stages from left to right (e.g. stage 3 will cost 2AP to deploy in). As Current Stage moves forward the cost also moves with it, so if Stage 2 becomes the current stage, the cost chart becomes 3/3/2/2. Notice the 3 that sweaps in from the left. And 3s will continue to sweap in from the left, so when the Current Stage becomes the Stage 3 the deployment chart becomes 3/3/3/2 and so on. Another persuation for the good player to advance fast, and for Evil player to think fast.[/spoiler]

Let me know what you think. It took sometime to collect the scattered ideas from papers and put them all together, especially it's been sometime since I wrote them down. So, let me know if you think this is interesting, as it'll sure encourage me to dig the papers some more fo game play details.


Last edited by MuslimRohirrim on Tue Sep 30, 2008 6:58 pm, edited 14 times in total.
Top
  Profile  
Reply with quote  
 Post subject:
PostPosted: Fri Sep 05, 2008 2:27 pm 
Craftsman
Craftsman
User avatar
Offline

Joined: Tue May 27, 2008 7:19 am
Posts: 311
I updated the Stages section with my idea about Stages borders, and provided a map for better illustration. This is one of the greatest map I found on the internet for ME with good resolution, but it misses the lower part of the map and of course each stage shoud be divided into regions but I think you should get the idea. I may try to post an idea about how regions should look like later.

I would really appreciate your C&C...
Top
  Profile  
Reply with quote  
 Post subject:
PostPosted: Fri Sep 05, 2008 3:40 pm 
Elven Warrior
Elven Warrior
User avatar
Offline

Joined: Fri Oct 20, 2006 6:54 pm
Posts: 973
Location: Wirral
I like the layout of this thread, just like the layout of the other thread you made with a list of all the possible options in a SBG game.

The objectives make sense to me, it means all the little battles slightly affect the overall result which is a good victory condition :wink:

But I'm quite confused after reading it, what it is all about. Could you answer a few questions for me please.

1. Is this going to be a similar game to LOTR Risk?
2. Or is this going to be a campaign were you move your armies around the map and then fight them using the SBG rules?

The cards are interesting addition, but I don't understand their use yet, do you need to write up the rules for them still? Or are they complete?

The Map is an awesome one, I've seen it before but how come you have divided it into four sections? The stages also threw me off, why are there 4 stages? Can't armies move around freely and attack/defend areas of the player's choice?

Could you explain to me what the action pool is and does, I read through it but didn't click onto its relevance within the campaign. I like the Deployment Chart, evil should always have the upper hand at the start of a campaign.

This seems very different from other campaign ideas I have seen, and would like to see more and understand the system better if that makes sense. Looking forward to seeing more :)

_________________
The Southern Fiefdoms: http://www.one-ring.co.uk/viewtopic.php?f=5&t=21928
Top
  Profile  
Reply with quote  
 Post subject:
PostPosted: Fri Sep 05, 2008 7:55 pm 
Craftsman
Craftsman
User avatar
Offline

Joined: Tue May 27, 2008 7:19 am
Posts: 311
lorderkenbrand wrote:
I like the layout of this thread, just like the layout of the other thread you made with a list of all the possible options in a SBG game.


Glad you lik it. It takes lot of time to prepare the post by hope it makes it easy for you to follow the idea, especially with such long posts. I couldn't use it for this once so sorry for the long post but it was necessary I think to better present the idea. And can't wait to know what you think.

lorderkenbrand wrote:
1. Is this going to be a similar game to LOTR Risk?
2. Or is this going to be a campaign were you move your armies around the map and then fight them using the SBG rules?


lorderkenbrand wrote:
This seems very different from other campaign ideas I have seen, and would like to see more and understand the system better if that makes sense. Looking forward to seeing more :)


Second one is more like it as I mentioned in the Game Objective section. That's why you may feel it's kinda different than other campaigns. It's a LOTR Risk that uses SBG table top rules for battles. It's taking ideas from various board and TCG games I played (War of the ring board game, Decipher LOTR TCG, some PC strategy games....), but the main line is somehow different than they are.

So you gonna work you own strategy and tactics, deploy and move your heroes and armies freely on the global stratigic map (even your current collection won't limit your options, except may be for Named Heroes who you need to have or proxy if agreed upon), but when it comes to war you'll to the table battle field to really fight your foe, not just roll for it or through cards in as in most board games.

This game also is not a certain number players specific. The limit of players is the number of Nations you can assign on the map. It's you're own choice.

lorderkenbrand wrote:
The Map is an awesome one, I've seen it before but how come you have divided it into four sections? The stages also threw me off, why are there 4 stages? Can't armies move around freely and attack/defend areas of the player's choice?


Ok...I expected I may have to explain more on these topics before I get into Game Play. Though it will may be clearer when I manage to collect and post Game Play, but I'll try to explain it as much as possible for at this point.

You have to always keep in mind that this game is about playing in Lord of The Ring Adventure atmosphere. So Stages and Cards mechanic are designed to work this way, and that's mainly what makes it unique between other caompaigns.

In a normal Stratigic or Risk board you can easily decide to ready your Mordor army to full capacity as soon as possible and wage a quick war on Gondor early in the game. But remember it's all about the adventure atmosphere and the storyline. Taht wouldn't happen in the game..Even powerful Sauron wasn't that ready such an early stage in the game. He was still building his force which took him time that even when he decided to move his armies that was earlier than he planned because of the threats Free People throw at him (Ring is their hands, Saruman was overthrown, and even a new King is coming). That's exactly what Stages are doing it put you to the same test each side.

Example: If you're Sauron (at Stage 4 - Inactive Stage at the beginning of game). It's better to work on strengthening your forces and better position them to be ready for an unavoidable war (Remember that your opponent is under pressure of time himself, and shall try to move as fast as possible to choke you on the deployment cost). You can still concentrate on moving your armies and fight gondor as soon as possible if you like or to seize an opportunity. But as this was not the right time in the adventure and you were not yet prepared enough, so the game will put you in much harder test to pass if you want to acheive this.
You need to spread darkness for your armies to move in its shadow. You need to Expand your control over new land and try to fold in Gondor's regions...Osgiliath for a start. Then your armies will be able to move on and take it down.
So you have the choice at all times, but it's the atmosphere of the storyline that will suggest a more proper way to handle things. You still can work in another direction but in much harder way.

Stages are more like your Dplomacy track. It's not just a token you decide to move down the ttrack to go to war, but it's how you can distract your opponents to work out your plan.

Back to story line and its atmosphere. All Nations are going to war sooner or later, but shadow powers are trying to weaken their foes by "Enslaving them", "breaking their minds", "controlling their will" (Wringwraiths, Denethor, and Theoden).
While the Free people small gathering primary hope is to push the Ring further to mount doom and destroy it, but also hoping to "awaken" the good Nations (specially with the proficied return of the king is now a small but possible growing threat to shadow) and find a way to catch on the deployment gap with the Shadow side.

lorderkenbrand wrote:
The cards are interesting addition, but I don't understand their use yet, do you need to write up the rules for them still? Or are they complete?


The game is yet far from complete, Cards in particular. I'll try to give an idea for now and for more later.
Whatever you're trying to do, the cards will give you more hints on the way you should take. And shall influence the way you plan your strategy on the turn level and eventually on the whole game level.
They are like the events and opportunities that may happen at any point and in a different order from game to another to cast a different flavor and variation for each game.

You can't just deploy a hero or certain points worth force on the map, but you have to have the card that allows you to. That's the main mechanic in the game. You draw cards, see how much AP you have, and you plan which actions you'll go for this turn. The only exception will be Movement, as there are no cards for movement. You don't have to play a card to move. You can move freely as long as you pay the AP cost, and for more details on this subject in the game play.

So cards are controlling my strategy??
In a way it may recommend a certain way of playing, but you are also controlling them in another way...let me get back to this a min, but now you have to note that this also gives a different flavor to your game than the ones you may played before. You can't play each game with the same way and strategy, but you have to see what opportunities you have and seize them as you go.

Now back to how you may control your strategy with some examples:
The mix of your cards greatly decides your strategy for the turn. Shadow player starts his hand with a more balanced hand reflecting his better preparation for a war long planned. 5 Political and 3 Ring cards. Why the 3 Ring cards? this is to capture the moment he realized that the ring has been found again and trying to shift his plans and assign more resources to hunting the ring. Freeps on the other hand, has only one hope for the moment, which is destroying the ring. And that's reflected in their 7 Ring cards and only small hope of a political help (may be from elves and wizards) reflected in only 1 Political card.
"Strategy Changes Doesn't Usually Happen Overnight"
as you play you'll have to play both types of cards to suite your strategy, but reconiliation rules will give swings that you have to try to manage as best as you can to get a grip on your fate. You can't fully control events and so you won't be able to fully control this mechanic. But you'll be able to somehow work around it. Let me give you an example:

If Sauron decided that it's envain working on movement in an Inactive Stage and it's better if I hunt this ring down and get rid of that imp that carries the ring. After all the ring wants to get to me...hohahahah...(oh, he hasn't got a mouth to laugh with yet.... :lol: )

So now how we can get more Ring cards in my hand to gain more AP and more cards to concentrate on the ring hunt. He ended his first turn with 3P+1R cards. According to reconciliation chart he should draw 2 from each deck. And now he's back to 5P+3R and nothing new. This is good strategy if you want to keep your mix, but it's not a good one to change it.

A wiser player would have ended with 2P+2R at the end of the turn, still 4 cards played but this time and according to Reconiliation Chart he should also draw 2 from each deck to get to 4P+4R mix with more Ring cards to control on the next turn. Small change...may be...but remember the motto above.... :wink:

Your strategy to govern and your swing to take. And take care Riconciliation Chart is designed to shake you off your strategy most of the time :twisted: . Another challenge, and so consider yourself warned.

lorderkenbrand wrote:
Could you explain to me what the action pool is and does, I read through it but didn't click onto its relevance within the campaign. I like the Deployment Chart, evil should always have the upper hand at the start of a campaign.


Hope this helps for now and please let me know what do you think. Kepp C&C coming, it really helps.

I managed to collect some of the game play ideas from papers to post soon, may be it will help to give you more feel of the game.


Last edited by MuslimRohirrim on Fri Sep 26, 2008 7:56 pm, edited 1 time in total.
Top
  Profile  
Reply with quote  
 Post subject:
PostPosted: Sat Sep 06, 2008 1:16 pm 
Elven Warrior
Elven Warrior
User avatar
Offline

Joined: Fri Oct 20, 2006 6:54 pm
Posts: 973
Location: Wirral
Thats a huge reply, thanks for answering my questions. Reading through your first post again and your latest reply has made this system appear a lot easier to understand. There are some great concepts here, but a lot of the text is randomly ordered and I noticed certain things that related to one another in different sections. I understand it has yet to be completed but once you think all of the text has been written, I could help you in ordering it into appropriate sections if you want :wink:

Quote:
Ok...I expected I may have to explain more on these topics before I get into Game Play. Though it will may be clearer when I manage to collect and post Game Play, but I'll try to explain it as much as possible for at this point.


I think the reason I may not have understood the campaign system as first was because you had not revealed the 'Game Play' rules. Once you complete this section it will be easier for people to comment/criticise on the system. Looking forward to seeing it soon

Also once you have finished explaining every rule and the system, you could put it into a PDF file so

1. people can download it
2. it will be organised into a neat, easy-to-read piece

not to say this isn't :)

Looking forward to seeing more

Jack

_________________
The Southern Fiefdoms: http://www.one-ring.co.uk/viewtopic.php?f=5&t=21928
Top
  Profile  
Reply with quote  
 Post subject:
PostPosted: Tue Sep 09, 2008 1:16 pm 
Craftsman
Craftsman
User avatar
Offline

Joined: Tue May 27, 2008 7:19 am
Posts: 311
Thanks lorderkenbrand for your constructive feed-back and encouragement, and here I post the Game Play as promised. Hope you all find it interesting and easy to read (though of course long :D ).

It's still not complete and some parts are not ready to be posted yet so keep on reading and of course your C&C are highly appreciated.
Top
  Profile  
Reply with quote  
 Post subject:
PostPosted: Tue Sep 09, 2008 1:17 pm 
Craftsman
Craftsman
User avatar
Offline

Joined: Tue May 27, 2008 7:19 am
Posts: 311
[h2][center]Game Play[/center][/h2]
[center][h3]These rules are not yet complete and still under testing and revision, but I preferred to post it at this stage for brain storming. So please let me know what you think and if you see something you think it'll be better if it's changed and how.[/h3][/center]
[h2][center][h3]What you need to start playing[/h3][/center][/h2]
[spoiler]You can either play the whole game or play certain Stage(s). There is a min models to play in each case but you can always use more or come out with your own combination if you like as far as you keep at least 2:1 ratio in favor of Shadow side. As for armies you'll deploy as many points as you can on map respecting deployment rules, then if battle occurs you'll use your GW LOTR SBG models to form your army list and fight a normal SBG table top battle.

Note: The only unit's status that's accessible from Strategic Map are the Might,Will and Fate. Their usage will come in different places in the Game Play rules.

[h2]Stage 1 only:[/h2]
- FSP starts at Hobbiton.
- Min Models: FSP (the 4 Hobbits and Aragorn), and 5 Nazguls.
- Objective: Good player must recruit Merry and Aragorn in FSP (not optional as in wholg game play), and declare in Bree to complete the Stage (Both is a Major Victory, Only 1 is a Minor Victory). Evil player should kill RB (Major victory), or kill Aragorn (Minor Victory).
- Special Rule: None

[h2]Stage 2 only:[/h2]
- FSP starts at any region touching the eastern border of Bree.
- Min Models: FSP (All), and 9 Nazguls.
- Objective: Good player must declare in Rivendel, and leave through the Moria's gate (Both is a Major Victory, either is a Minor Victory). Evil Player should try to kill RB (Major Victory), or kill Aragorn/Gandalf the white (Minor Victory). Both sides acheived an objective by end of same turn is a draw.
- Special Rule: None

[h2]Stage 3 only:[/h2]
- FSP starts in Moria (special mini-Map that should lead to an exit in Dimrill Dale) (If Gandalf the Grey is killed at any stage, only then Gandalf The White may be sent back to Middle Earth - see special rules)
- Min Models: FSP (All). Any 2 Nation's armies - one from each side keeping the 2:1 ratio in favor of Shadow side at initial deployment.
- Objective: Good player must declare in Emyn Muil (Major Victory), 1 Shadow Capital is down (Minor Victory). Evil Player should try to kill RB or Kidnap him to Orthanc (Minor Victory), 1 Good Stronghold is down (Major Victory). Both sides acheived an objective by end of same turn is a draw.
- Special Rule:The White Wizard will know: Gandalf the white can be deployed in Fangorn, only if good side has at least 30 Victory Points and one of the separate Fellowship Members is inside Fangorn region.

[h2]Stage 4 only:[/h2]
- Fellowship (Sam and Frodo, and Gollum if you like) starts at Emyn Muil. Rest of FSP are separate heroes now. They enter stage in 2 waves, first are Gandy and Pippin and then second are the rest. After turn 3 start rolling for the arrival of the due wave. They enter the play on a roll of 6 (only one roll that can't be modified by Might) right after reconciliation, and then start at White Mountain when it meets Stage 3 border and can act on the same turn they arrive.
- Min Models: FSP (All except Boromir). Any 2 Nation's armies - one from each side keeping the 2:1 ratio in favor of Shadow side at initial deployment.
- Objective: Good player must declate in Rivendel, and leave through the Moria's gate (Both is a Major Victory, either is a Minor Victory). Evil Player should try to kill RB (Major Victory), or kill Aragorn/Gandalf (Minor Victory).
- Special Rule:The Return of The King: Aragorn can be declared as King only if good side has 60VP and Aragorn is in free Minas Tirith.

[h2]Couple of Stages short of a full game: (Stages should be successive)[/h2]
- FSP starts as the first Stage rules.
- Min Models: Besides FSP, each one as it rules. (Means at least 1 of each sides Nation at each of the Stages should exist).
- Objective: The first Stage is the Current and all Stages mechanics are working. Objective of each Stage is a must to unlock the next Stage and Make it the Current.
- Special Rule: Same special rules works as each Stage rules.

[h2]Full game: (Stages should be successive)[/h2][/spoiler]

[h2][center][h3]Game Phases[/h3][/center][/h2]
[spoiler]1) Reconciliation
2) FSP Movement
3) Trap Fellowship
4) Test the Trap
5) Declare Fellowship
6) Taking Actions (Main Cards Play)
7) End Turn[/spoiler]

[h2][center][h3]General Movement[/h3][/center][/h2]
[spoiler]
[h2]Movement Limit:[/h2]
Normal: Units/Army: 1 region per turn.
Spirits,Flying Creatures,Dragons and Nazguls (even on steed): can move 2 regions per turn.
Fellowship (FSP) special movement: They can move hidden, while Nazguls and agents will try to trp them and uncover their True Position (TP) (More details in Fellowship Hidden Movement section)

[h2]Attacking:[/h2]
Attack: Moving into a regin with one or more foe armies in it is considered to attacking this army.
Engagement: No one can move from such a region with mixed sides any more and they're considered to be engaged. Their battle will be fought in a table top scenario during the End Phase.

[h2]Advanced Rules[/h2]
Hide/Sneak: An army below half of a level 1 amy points agreed upon can choose to hide/sneak if the opposite army is at least of level 2 army points. This has to be declared as soon as an army attacks the region this army is in. Who calls the Hide/Sneak then should roll on the following chart:
1-3 He is trapped and must fight.
4-5 He manages to Hide unnoticed. The opposite army moves by and gets 1 free movement to move it immidiately to any of the FREE adjacent regions. If no possible regions to move to, then they had to camp in this location and as they secure the area discover the hiding part and battle must be fought. Attacker can't Hide so he's trappped and must fight.
6 He Manages to sneak past the enemy lines. He gets 1 free movement more and move on to any of the FREE adjacent regions. If no possible regions to move to, then they were surprised by the unpleasant situation and uncovered their own position, and battle must be fought.

Note: Either sides (Attacker/Defender) can call a Sneak, the attacker to go past the army blocking his way and the defender to escape a possible disaster. Attacker on the otherhand can't call a Hide, so if he's rolling for Sneak and gets 4-5, then he's counted as trapped and must fight. In short, the attacker must get a 6 to work out the Sneak past the army already securing the area.

You see it's a risky choice but it's logic that it may appeal to you if you find yourself outnumbered with about 3:1 or more, or you may be want to try to sneak past an enemy army.[/spoiler]

[h2][center][h3]Fellowship (FSP) hidden Movement and Nazgul Trap[/h3][/center][/h2]
[spoiler]- FSP move 1 region per turn as usual, though it costs more AP than normal movement. (Number of FSP to a max of 5AP and a min of 3AP)
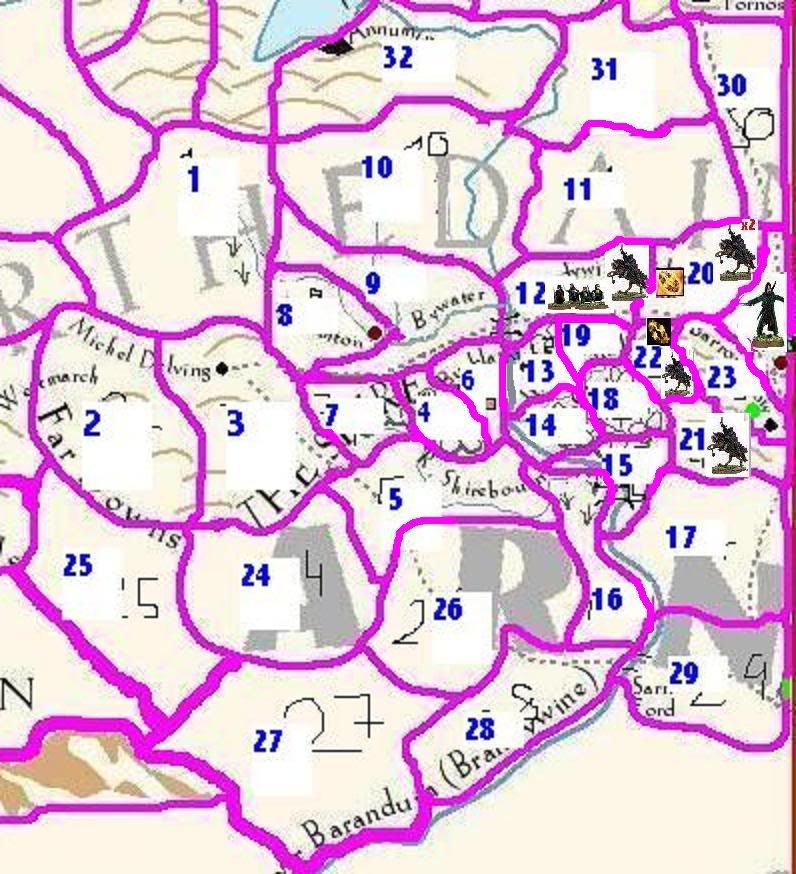
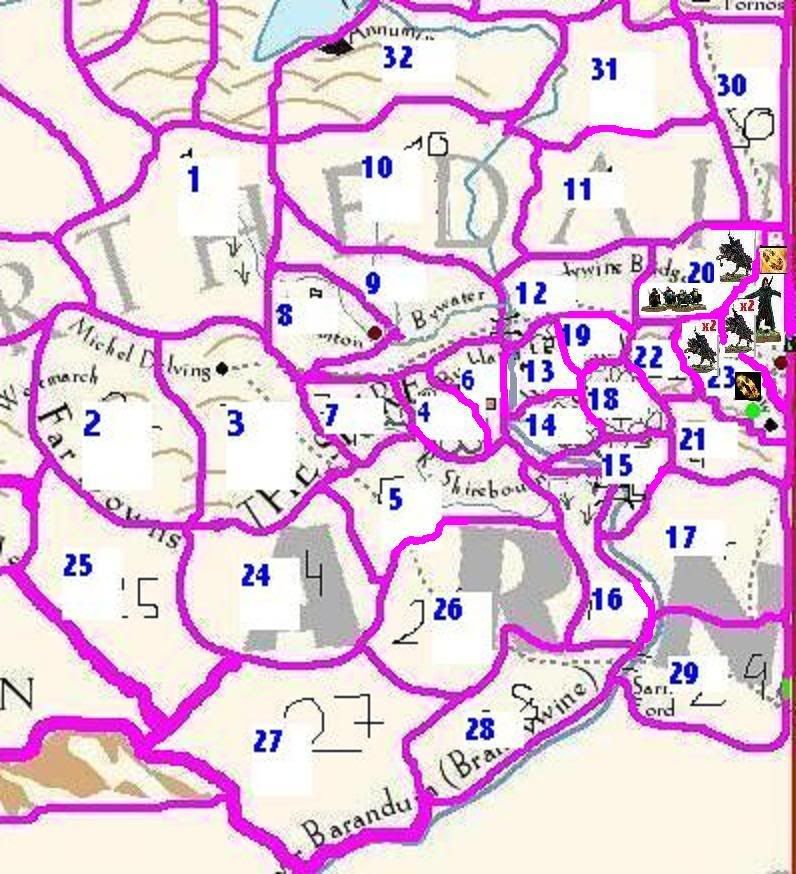
- FSP doesn't really move their models to new location unless they get revealed/declared. So now Evil side only knows their Last Known Position (LKP) for sure, and he'll try to trap and uncover their TP (True Position) to kill/Kidnapp Ring Bearer (RB) or lay more burdens on him and on his fellowship.
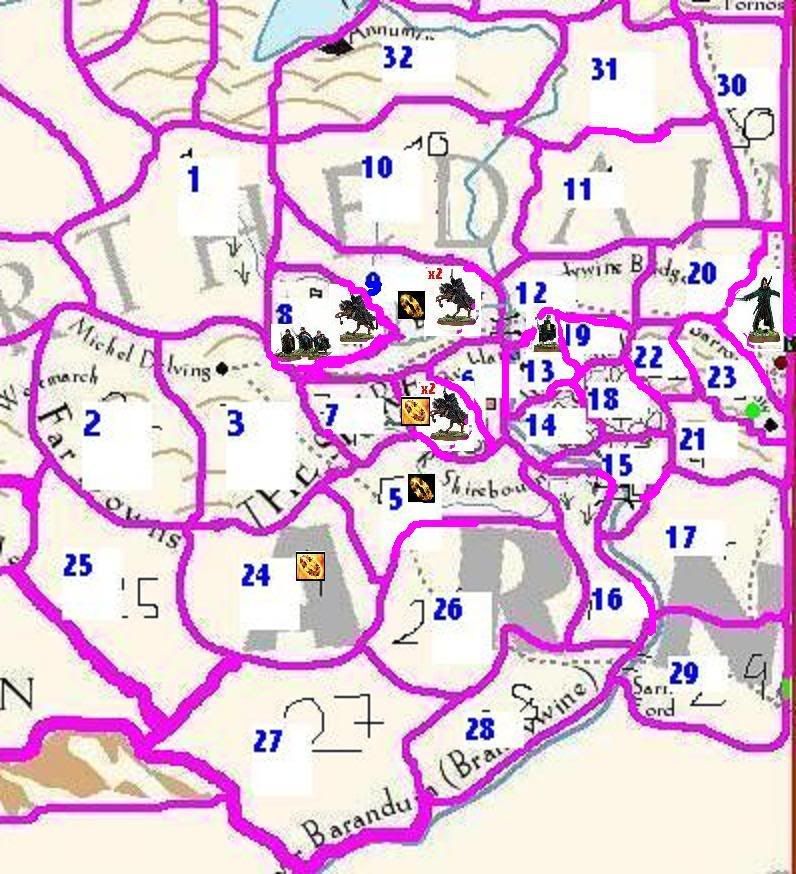
- Good side uses tokens to indicate the possible FSP target locations. All tokens are put face down with only the True Location tokens has a distinct predifined mark that players agree on before game.
- FSP has to decalre position every 2 turns.

[h2]FSP 2 turns movement:[/h2]
Turn1: They can assign movement to 2 different regions (4 in Stage 2 and beyond), only 1 of them carry the True Location mark (2 in Stage 2 and beyond). Tokens should be 1 region away from LKP (Last Known Position). FSP starts this turn automatically as hidden even if they were revealed the previous turn.
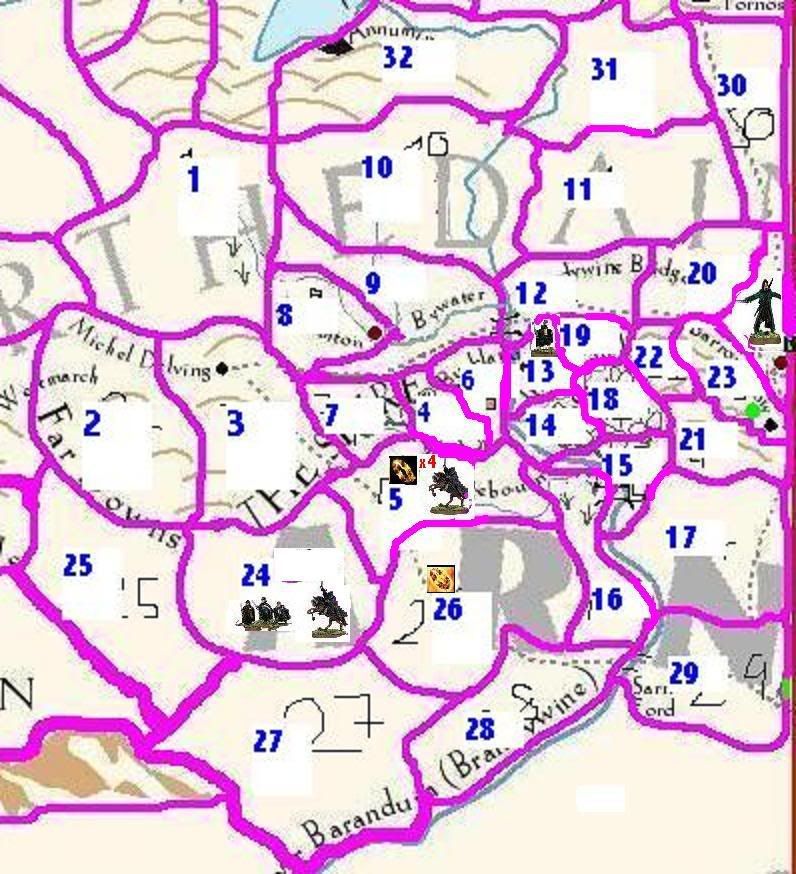
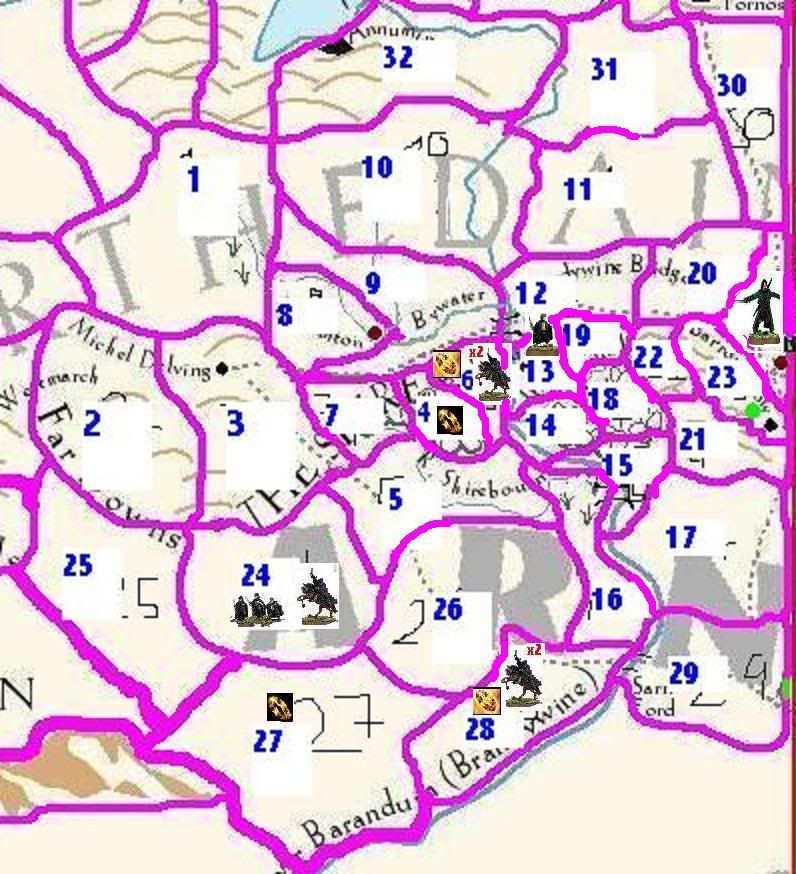
Turn2: Each token placed in first turn may be split to 2 more tokens. Tokens should be 1 region away from first turn tokens. Don't forget to remove the first turn tokens from play. Now you'll end up with a total of 4 possibilities (8 in Stage 2 and beyond). If FSP hasn't been trapped and Revealed during this turn they have to Declare their position by end of the turn and move the models to it. Declaring Fellowship must be in an untrapped True Location, except if it's a Free People City at which Fellowship can Declare even if it's Trapped.

Special Case: In both turns a True Location token can be put on the LKP to resemble the FSP resting this turn. In such case to successfully trap the FSP at this position, Evil side must put one more Nazgul on the LKP to cover this possibility if he wants so 2 Nazguls should be at LKP. It may make Fellowship loses time, but it could also make a good decoy!! :wink:

[h2]Lost Fellowship and The Guide Companion:[/h2]
<Comping Up Soon>

[h2]Trap Fellowship:[/h2]
Evil side shall try to trap FSP to get to the RB. A Trap may envolve Nazgul/Armies with Agent's help. How to form a Trap (Trap Jaws) rules slightly differs from Stage to Stage with the main idea is to try to uncover the True Location (Token) the FSP is moving to. Nazguls can't enter Free People's Strongholds regions, Elven Cities, Fangorn, or Bombadil's Territory (the region containing Oldman Willow and the one containing Bombadil's House) unless they are part of an attacking army of at least 300 points other than Nazguls.

How to Form a Trap:

Stage 1: 1 Nazgul should be on the LKP and 2 Nazguls should be at each of the TPs for a Successful Trap. Max of 3 Nazguls on FSP first movement turn and max of 5 Nazguls on the FSP second movement turn may be envolved in the trap. One of them should be at the LKP and 2 at each TP for a Successful Trap.
Stage 2: A min of 4 and max 5 Nazguls can form the trap on the FSP first movement turn or same min and all Nazguls, one of them should be at the LKP and 2 at each TP for a Successful Trap. An Agent may replace 1 Nazgul, but at least 1 Nazgul should be at each of the Jaws. When FSP has to reveal, then if neither of the TP is trapped, FSP can choose to declare at any of them if needed. However if only one TP is trapped, then it's still not a successful trap but FSP can only declare at the other one if they want.
Stage 3: This is Saruman's territory as agreed with The Great Sauron, and Nazguls don't have the permission yet to cross the river. But 1 army can replace 2 Nazguls, and agents can still help by replacing 1 Army at any Jaw. The only difference is that no Army should be at the LKP, but if an Agent is envolved in any Jaw then an agent should be at the LKP. A min of 1 army and a max of 2 armies can be envolved in a trap, but if there is an agent at the LKP then a max of 3 armies can be used.
Stage 4: Can be a mix of Stage 3 and 4. No agents are in this Stage, and max of 5 Jaws can be formed including the LKP. Each single Jaw may be all Nazguls or all Armies. If Nazguls are envolved then 1 Nazgul should be at the LKP, but if only armies are envolved then it's not a must to place anyone at the LKP.
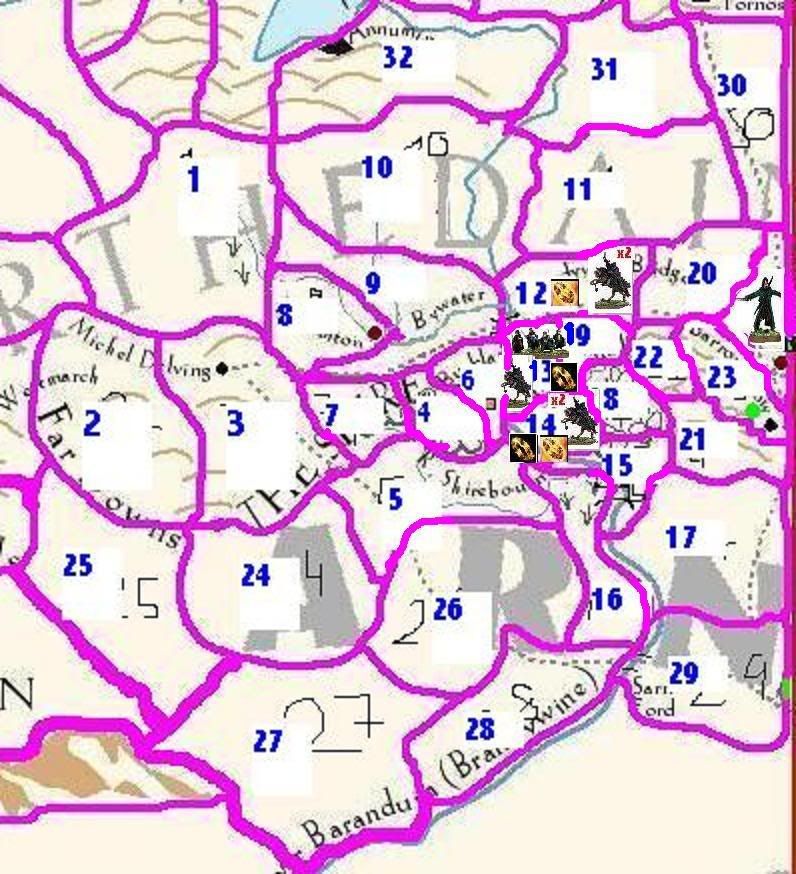
Successful Trap:
A trapped FSP may choose either to play Escape Trap card, or make an Escape Roll and concult the following Chart:
6 A Burden must be taken on any of the FSP members inc. RB
4-5 A Burden must be taken on RB.
1-3 A Burden on RB and a Trap Scenario.

- Special Cases:
1) If one of the True Locations is a Freeps City, then a 6 roll means no Burdens at all and you get a +1 to the result besides any other modification. Agents can't be envolved in such a Trap.
2) If one or more of the True Locations is in Mountains/Hills/Bog/Woods, then Good Player may roll for only one True Locations in such terrain to Escape the Successful Trap. One die is rolled and a 5+ must be scored for the roll to be a success. If it's a successful roll then FSP can still Declare in this region in spite of the Trap Jaw there.
3) If an agent is envolved in the jaw trapping one of the True Possition and no agent envolved in the Last Known Position add +1 to the roll result besides any other modification.
4) If no Last Known Position Jaw there is no Trap at all. So Fellowship can declare at any of the True Locations no matter how many Nazguls are there.

If more than 1 True Location, then FSP must declare they are moving to the City True Location before rolling and can't move otherwise even if roll fails.

Trap Scenario:

- Scenario used:
______________
Use the "Flight to the FERRY scenario" http://uk.games-workshop.com/heraldsofthefree/flight-to-ferry/1/ from the GW site or any similar scenario with the objective for Good side is for RB to escape the Board at certain point (Ferry or not). And for Evil side is to try to kill RB (Only Kidnap him or any of the Hobbits and flee the board from predefined point - usually on the opposite board edge/corner from where escape point of RB exists)

- Participants:
____________
From the Good side all FSP must fight.

From the Evil side: Evil Side picks a max of 5 Nazguls/Agents (Nazguls on Foot) from Trappers (a max of 3 if only Hobbits are in FSP).
If trap is formed by armies as in Stage 3, then a max of same FSP worth of points (to a max of 500 points) may be picked from trapping armies, and a mix can be made from different trapping armies.

- Location:
_________
The battle is fought at either one of the True Locations trapped as Good Player chooses, and this one will be their destination if they survived.

- Special Rules:
_____________
- All rules in Special Rules section at the end of this Game Play, except "Samwise the Brave", which cannot be used in Trap Scenarios.
- If agreed, you can use Sentry Mode rules for Nazguls fighting only Hobbits.

[h2]Declaring Fellowship:[/h2]
Besides that the TP of FSP will be revealed once they're successfully trapped, they can voluntarily declare their True Position at an untrapped True Location for other reasons. If the True Location is at a Free People City, Fellowship can Declare there even if it's Trapped. Those reasons may be:
1- Stage Border Region (SBR): to unlock the Active Stage (AS). The Current Stage (CS) now become a Past Stage (PS), while the AS becomes the new CS.
2- A new FSP member: to enable one of the nine to join in the FSP, FSP mut be declared in the region he exsists in. These Named Heros are deployed at the start of the game and can't move unless FSP is declared in their region and they declared part of the FSP and moves around with the group, or after the FSP unlocks the next Stage without hiring them and then they can't join FSP no more and act as a normal Named Hero. Just note that Voluntarily declaring FSP doesn't reset FSP turns as Revealing does. So if declaring occurs after FSP 1st turn they go for their second turn normally (not if Revealed, they start on 1st FSP turn again then).
[/spoiler]

[h2][center][h3]War of The Ring (Burdens)[/h3][/center][/h2]
[spoiler]Assigning and Fighting Burdens is the soul of war between Good and Evil in Middle-Earth. The real War of The Ring. Other battles are in vain if this one is lost. It's main essence is the will of the RB and of course his Companions whose their main mission is to provide good councel and to defy dangers and risks, and keep them off of him.
Here are their war rules that they'll fight till the Ring is destryed....or the Fellowship is broken...

[h2]How much Endurance Points does each Fellowship member have:[/h2]
Once a number of Burdens equal to Fellowship member's Endurance Points is assigned to him, he's fully Corrupted and gets removed from the Map as a casualty and be deployed again at any point.

Frodo=9 Endurance Points
Sam=5 Endurance Points
Aragorn=5 EP
Gandalf=6 EP
Legolas=4 EP
Gimli=4 EP
Pippin=3 EP
Merry=3 EP
Boromir=2 EP

Note: If not a Full Game is Played, subtract 2 Burdens from each of the FSP members for each Stage removed to the min of 1 Burden. So if you're playing only 2 Stages of the Game for instance subtract 4 Burdens for the 2 you won't play. For example in such case Boromir would have 1 Burden (the min.), Frodo 5 Burdens, Gandalf 2 Burdens...

[h2]Taking Burdens:[/h2]
You'll notice that sometimes it's your decision to embrace the Ring's power and take aburden. Yes, just like you're really living the story...It is your choice and your will that's put to the test here!!!
- Lidless Eye: a card with direct burden and may be a way to escape it (rolling a 6)
- It's getting heavier: cards that ring adds burden to RB (and may be to FSP members, trying to tempt them). These cards usually comes with a condition of a nearby Nazgul or as Ring is closer to its original Master(Stage 4). Also these cards may come with a way to escape (roll a 5+).
- RB will voluntarily take a Burden if he may decide to:
....* Escape a trap (Global Map)
....* Escape a wound (Battle)
....* Wearing the ring in the Battle (once per battle even if RB succeeded in putting it on anf off multiple times during the same battle)

[h2]Escaping Burdens:[/h2]
A FSP members including RB can escape a burden by using 1 Will and rolling a 5+, it's a 1 try so no more wills can be used. This way can't be used with Burdens taken instead of a wound (in battle)

[h2]Healing Burdens:[/h2]
- only 3 cards in the Ring deck can heal burdens so be careful on taking them.
- Unlocking a Stage heals 1 Burden.
- Every turn you stay at Rivendel after the first heals a burden from each of the FSP members (to a min of 1 on each and 4 for RB). But during every one of those turns, only Isengard can use Current stage rules including Stack limits but units can't cross to other Stages. Immediately after FSP leaves Rivendell, Isengard status gets back to normal. Isengard armies that may have surpassed the normal stacking limit keeps what's deployed, but can't deploy no more unless it gets below normal stacking limit again.[/spoiler]

[h2][center][h3]Deployment[/h3][/center][/h2]
[spoiler]Initial Deployment: Number of Points will be given to each Nation to Deploy any of its Units or Heroes in any if its controlled zones at the beginning of the game (Only Named Heroes need to be put on Map, rest of the point are just distributed for now to be used in forming lists in case of a battle in region they are in). Note that Shadow should have more forces deployed (at least 2:1) to reflect superior position due to war long planned.

In game Deployment: Units or Heroes deployed this way can only be deployed in a City or Stronghold of their Nation that's within their Nation's Control Border and respecting the stacking rules. (For more details on Control Regions and managing your control see the Nation's Control Zone section)[/spoiler]

[h2][center][h3]Nation's Control Zone[/h3][/center][/h2]
[spoiler]Some effects can cause the power of the Nation to shrink or expand, and so it loses control over regions or gain control over neighboring regions. Expantion is only allowed to region touching the broders of a fuly controlled (not shared) region of the same Nation.

Shrink: Grima's effect may cause the control of Rohan to decrease when he gains control over Theoden, which causes Rohan's border to shrink letting out some Rohan Villages at risk of Saruman's attack when the region becomes Active. Other events may have the same effext. If a Nation shrinked out of a region that it has units in, these units must respect Stage rules so they can move back as part of their movement if possible, otherwise they're stuck without reinforcements in foreign lands till borders expand again or some miracule happens or some special movement units come to their rescue. These units may not be able to act but can defend themselves if attacked of course. Nation's Control can't shrink out of it's Capital's region, but if this Nation only controls it's Capital Region and an Evil Army managed to occupu it and derive all this Nation's army out of it then this Nation has been totally taken over and all its armies should be immediately be removed from game.

Expand: Sauron's dark magic may push darkness over land to fold in more regions till it pushes into Gondor's borders (see Shared Regions rules later). At some point it may fold Osgiliath in so that Sauron's forces can attack it even if the region is still Inactive.

[h2]Fight over regions (Shared Regions, and Battles of Control):[/h2]
- One Nation can expand to fold in one of a neighbor Nation's regions. Only on Foe's or Shared regions but not on a same side's fully controlled region.
- This climed region becomes shared between the two Nations, and both can use the Stages rules of a controlled region to their benefit.
- The only way one nation can claim sole control on it is by shrinking all other Nation's controls out of it, or make one more expansion move (push out) in the region. In such case If all remaining Nations controlling the region are from same side, this side must declare it to be under full control of one of them and other draw back their control and respect the Stage's rules.
- Shrinking Nation must shrink control out of all Shared Regions first before shrinking out of any other fully controlled regions.
- Expanding Nation may think of expanding (push out) in a shared nation to free it and gain full control over it, but it's not a must.

[h2]Nations tha may have Control Zones on the Map:[/h2]
Iron Hill (Dwarves)
Shire
Rivendel
Moria
Rhun (Easterlings)
Near Harad (Haradrims)
Far Harad (Mahuds)
Khand
Dol Goldor (Including Spiders)
Woodland Realm
Grey Havens (Ships)
Umbar (Corsairs)
Rohan
Gondor
Lorien (High Elves - Galadhrim)
Fangorn (Ents)
Isengard
Mordor
Angmar
Mount Gundabad

Note: If you don't play a Nation then it has no Control Zone, but its Cities and Stronhlds capturing normally counts towards VP.
[/spoiler]

[h2][center][h3]End phase[/h3][/center][/h2]
[spoiler]This is the phase where battles take place. Any situation of a region that contains armies from opposite sides should be resolved immediately.

[h2]Which battle goes first[/h2]
As long as there are still battles to fight, each player rolls a die and whoever gets the higher result decides the next battle (reroll if a tie)

[h2]Discard[/h2]
After all battles are fought and recorded and before starting a new turn, each player may discard 1 card from his hand.

[h2]Victory Points (VP)[/h2]
You can win the game by Acheiving the Major Objective, or by collecting enough Victory Points. To win the game you must collect 300+ VP. The following are the targets on the map that would give you VP.
Capture a Stronghold (SH) = 60VP
Capture a City = 30VP
Win A book/Movies Scenario = 25VP
Win a Scenario = 10VP
Unlock a Stage in time = 15VP
Capture Hobbits (other than Ring Bearer) to Orthanc or Baradur = 20VP
Burden on all RBs = 5VP (If Frodo is dead and Sam took the Ring, Shadow player keeps the VP he got from Frodo's burdens so far + all Burdens on Sam so far immediately adds to PV too and start work on his burdens in the future)

[/spoiler]
[h2][center][h3]Battles and Possible Scenarios[/h3][/center][/h2]
[spoiler]Picking a scenario may be random but don't include a Book/Move scenario, which is a challenge scenario based on Player choice (as described later.
Winning a scenario worths 10 VP (5 points each for draw) except Book/Movies Scenarios.

Players are free to use all or part of the following scenarioes as long as they agree on them before the game, and they must include the Book/Movies Scenarioes and at least 4 other scenarios:
* A Clash of Piquets
* Contest of Champions
* Domination
* Ill Met by Moonlight
* Meeting Engagement
* Pitched Battle
* Reconnoitre
* Relief Force
* Seize the Prize
* Storm the Camp
* Take and Hold
* The High Ground
* To Kill a King
* To the Death
* Book/Movies Scenario (20 VP):
If in place of a Scenario (A battle that really occured in the books/movies) - these will be marked on the map with there correspondant challenge scenario. Any side can challenge the other side to a scenario instead of a random battle roll. If so, he offers him 10 points to accept the challenge. If he refuses he either loses 10 points or the challenger gains 10 points (Challenger's choice, or whatever possible as long as score stays positive).

[h2]Alternative Scenario Objective - Ring Bearer Rules:[/h2]
These rules are applied if FSP (inc. RB) is in battle:
Alternative Objective: An alternative objective is added to both sides. For evil to kill/kidnap RB, and for good to make him escape from the opposite edge of the board.
Deployment: FSP (inc. RB) is deployed last after both side's deployment and in any of the good side's possible deployment areas.
Primary scenario objective acheived: If either side acheived the main battle objective, then RB+FSP automatically considered as escaped.
Killing RB: Only if Nazguls are in battle killing the RB would be the alternative objective, otherwise kidnapping Ring Bearer would be the alternative objective.
Kidnapped Ring Bearer (Or any other hobbit in some scenarios):

- The main objective: The Evil capturing party on the strategic map in this case should move to Orthanc or Barad-Dur to win the whole game. If it's another hobbit then evil side just wins the points worth of this objective if he reaches Orthanc or Barad-Dur.
- Let's hunt some orcs: Good player should hunt them and try to retreive the kidnapped (ring bearer or any other hobbit) before they reach destination.
- Escape: Kidnapped Hobbit (inc. RB) can attempt to escape on the strategic map, in such case good player declares so right after cards reconciliation and rolls a die. The hobbit can Escape only on a roll of 6. If he does, good player can place him on any of the empty regions beside the one Capturing party is currently in and move him as a separate hero this turn (Any of the fellowship members can leave then rejoin FSP at any time in the game just by being in the same region and FSP declares it's position there.).
- It's all up to you: If only Fellowship in the battle without any army, the main objective will be killing (if Nazgul exists), or kidnapping Ring Bearer. Good side should either escape the opposite side of the board or break the evil army.[/spoiler]

[h2][center][h3]Post Battle[/h3][/center][/h2]
[spoiler][h2]Victorious[/h2]
Survivors: Record survivors' points of for each Nation and record it for the current region where the battle occurs.

[h2]Defeated[/h2]
Flee Battle Whoever survives from the defeated side after battle objective is acheived will leave battlefeild immediately and should flee 2 regions in an unknown direction respecting the Fleeing Rules. Neither the region they flee through or reach should contain foe force. If no such route then the defeated survivors are trapped and killed to the very last one and all their points should be removed immediately from map's records.

Fleeing Rules:
- There are two suggested ways to determine the Fleeing Way:
1) Their owner rolls a die, and if he gets 4+ he decides the way. If 1~3 is rolled the victorious side decides the way.
2) The other way is to use the scatter dice similar to the one from Warhammer 4000 to roll for the direction. Their owner rolls the dice. If he gets a "Hit" all his army has been hunted down and killed and all its points should be removed from map's records. If he rolls an arrow, the survivors follow that arrow direction to flee to their first region then their owner decides where to go from there. If from this region there were no further region that can be fleed to (as all direction from there are blocked by impassable terrain or contains foe forces), then all the army is decimated and should be removed immediately from map's records.

Survivors:
If there are still survivors after fleeing, then record survivors' points of for each Nation and record it for the region where they managed to flee to.[/spoiler]

[h2][center][h3]Special Rules (All Scenarios)[/h3][/center][/h2]
[spoiler]
[h2]Tricksy Hobitses:[/h2]
At the end of movement phase after both armies completed their movement, any hero hobbit can use 1 Might, Will, or Fate point to escape a Fight. In such case he can complete his movement if he still has any left.

[h2]No, you can't kill them:[/h2]
Nazguls that get removed from battle just get back 2 regions away from current battle's region, but continue the hunt on the strategic map. Evil side has only 1 time to use this previledge for each Nazgul (Take a note espicially for the named ones).

[h2]Bless you laddy![/h2]
Fellowship members except the ring bearer have fate somehow to their side, so they can get removed from a battle same number of times as their number of wounds. So if they get removed from battle they considered to be severely wounded that they have no more effect on battle, but they continue on the strategic map afterward as healed or got back from a fall. Gandalf gets a reset when he turns into Gandalf the white, and Aragorn gets 1 back when he's crowned, Boromir has to roll 4+ each time he dies to use this previledge, Merry and Pippin can lend each others 1 and so can Frodo and Sam. (So take a note of how many times fate favored them)

[h2]Samwise The Brave[/h2]
Sam can immediately claim the Ring and become the new Ring Bearer in the following situations:
If Frodo is Killed in battle If Sam is within 6"/14cm from Frodo, he immediately becomes the Ring Bearer.
If Frodo is Kidnapped in battle If Sam is within 6"/14cm from Frodo, he can attempt to roll one die and get a 6+ to claim the Ring and become the Ring Bearer.
If Frodo is Corrupted He never claims the Ring from the Ringwraith Frodo has become. Game is over then anyway!! ;)

[h2]It's getting Heavier[/h2]
If RB gets wounded he can use 1 Might/Will to convert the wound into a burden. That's of course besides the normal Fate points to completely avoid wounds.

[h2]Highter Stature[/h2]
Gandalf can't become the white unless joined the Fellowship first. And so is Aragorn, who can't be crowned unless he is part of the fellowship first.[/spoiler]

Let me know what you think so far, C&C would be very appreciated.


Last edited by MuslimRohirrim on Tue Sep 30, 2008 11:29 pm, edited 55 times in total.
Top
  Profile  
Reply with quote  
 Post subject:
PostPosted: Tue Sep 09, 2008 1:36 pm 
Craftsman
Craftsman
User avatar
Offline

Joined: Tue May 27, 2008 7:19 am
Posts: 311
To Make it easy for you to imagine how the game on the map would feel like, I'm posting a concept map of Stage 1 divided into regions. (Though not all of it yet, but enough to make you get the idea I think)

This is not the best resolution of the map, but it's what I could put on the net. In better resolution you could see Bucklebury ferry in which region and Farmor Magot's...
If you have a better idea of a better way to post it let me know.

You may notice that I tried to follow SBG rules for hard terrain and Make it harder to go through woods for instance than to go on the road. For example if you want to go from Bag End (Hobbiton) to Buckland and keep your feet on the road, you'll need to pass through 3 regions passing through Brandywine Bridge. While if you decide to stay off the road (as Gandalf advised you), you'll need a min of 4 regions to pass (4 turns). This extra turn is because of passing through the woods to the south of Hobitton (and may be more if you rolled bad in the Lost in the woods roll - coming up on in the Game Play)

Let me know what you think about it too.

[h2][center][h3]"Stage 1" Strategic Map[/h3][/center][/h2]
[spoiler]Image[/spoiler]
Top
  Profile  
Reply with quote  
 Post subject:
PostPosted: Wed Sep 10, 2008 9:19 pm 
Craftsman
Craftsman
User avatar
Offline

Joined: Tue May 27, 2008 7:19 am
Posts: 311
[h2][center]Test Game[/center][/h2]

This is not just a test game, it's also a showcase to represent the FSP strugle on their journey to destroy the Ring. It's the Core of the game so I thought it would give a good idea of the Game Play.

I tried to play one Stage game to separately test FSP movement mechanics - no cards were used for both sides. It went really well but I had to adjust some game numbers and options like lowering the total buredens the RB can take from 12 to 9 for the whole game to make it more challenging.

[h2][center][h3]Initial Deployment[/h3][/center][/h2]
[spoiler]FSP: 3 Hobbits (Frodo, Sam, Pippin) in Hobbiton (Region 8 )
Hobiton: 1/5 Nazgul (Region 8 )
Region east of Brandywine Bridge: 1/5 Nazgol (Region 12)
Regoin west of Buckleberry Ferry (at Farmer Magot's): 1/5 Nazguls (Region 6)
Region 20 near Bree: 2/5 Nazguls

Aragorn: in Bree (Region 33)
Merry: in Buckland (Region 13)
FSP member who hasn't join FSP yet is inactive and can't attack or be attacked or move till he joins FSP or next Stage is unlocked. In the later case if he wasn't already in FSP he can move only as a Named-Hero and can't Join FSP at all for the whole game.

You can see them on board in Boards's section.[/spoiler]

[h2][center][h3]Board[/h3][/center][/h2]
[spoiler]The map below is part of the game board with Initial Deployment. I numbered the regions for easier notations and Initial Models are positioned on it. Sorry again for bad resolution it was done in a haste. Notice the red "x2" beside the Nazgul figure to indicate 2 Nazguls are in region 20 near Bree.

Image[/spoiler]

[h2][center][h3]Adventure Starts - Turn 1[/h3][/center][/h2]
[spoiler]FSP always moves first

LKP 8 (means Fellowship Last Known Position is region 8 - LKP - for the FSP 2 Turns movement. Nazguls must put 1 Nazgul here as a part of the Trap)

(3),7 = O8,7 (Means that Good Player places tokens at regoins number as before the equal sign. Note: the region numbers between brackets are where Good Player placed his secret True Location tokens at. Nazguls moves are after the equal sign and they should trap TL. The one Preceded by O is to indicate they trapped LKP successfully. They went after the wrong Location so FSP are not revealed and can go for the Second FSP movement with 4 tokens and max of 5 Nazguls Trap)

Note: The Golden Token(s) represent the secret True Location(s) the FSP attempting to move to, while the Black Token(s) represent the False Locations.
Image[/IMG][/spoiler]

[h2][center][h3]Turn 2[/h3][/center][/h2]
[spoiler](24),5,(4),9 = O8,9,4 (Note: only one True Location is Trapped - so not a Successful Trap but now Good Player has only 1 possible Location to Declare at)

Declare - LKP 24 (FSP must be declared every 2 turns if not traped and revealed first. New Original Position at region 24 which is one of the non-trapped True Locations in case of Declared or Revealed)

Image[/spoiler]

[h2][center][h3]Turn 3[/h3][/center][/h2]
[spoiler]5,(26) = O24,5

Image[/spoiler]

[h2][center][h3]Turn 4[/h3][/center][/h2]
[spoiler](6),27,4,(28 ) = O24,28,6 (A Successful Trap due to the narrow and clear choice range)

Revealed - LKP 6 - rolled 6!! - RB takes NO Burden, Sam decided to take it in his place (FSP has to reveal their position at any of the True Locations in case of a Successful Trap and roll of 6 means No Burden, No battle - You can see the roll's chart in "FSP Hidden Movement" section under "Successful Trap")

Image[/spoiler]

[h2][center][h3]Turn 5[/h3][/center][/h2]
[spoiler](13),10 = 6,12,17 (No Trap - and one Nazgul on 6)

Declare - LKP 13 - (Buckland) Merry Joins the FSP - (Why Declare now? It is the first FSP step, but FSP can Declare their Position Valuntarily at anytime. They declare here because this is the only way Merry can join in as a FSP member. Note: Declaring doesn't reset the FSP turns but only revealing does, so next turn will still be FSP's second turn)

Image[/spoiler]

[h2][center][h3]Turn 6[/h3][/center][/h2]
[spoiler](19),(18 ),13,14 (FSP chose to put a token on 13, which is same as their LKP as if they were going to rest and roll for healing the burden on RB)

So, on second FSP movement turn they move into woods.
Now Lost Fellowship Test (Woods, Mountains, Hills, and Bogs) should be taken as follows:
- a roll for each Location containing wood region (You better agree on these regions before game), evil player choose the order of regions to roll for - he chooses 19, 18, 14 in sequence.
- Good player rolls for each of the regions in order chosen and consults the Lost Chart as follows:
===========================

1-3 Evil Player decides.

4-5 good player decides another but can't leave it in the same location unless there is no other choice. He then must move the token to another location even if it contains another token.

6 FSP managed to find the way to their desired destination. Token Stays where it is.

We're Lost:
- If FSP contains a Guide (Gandald, Aragorn or Gollum), they get a +1 for the roll on the Lost Chart.
- Nudging Token: The player can nudge the Token to an adjacent region, which must be at the same regions distance or less from Last Known Position as the one he moves the Token from even if it means multiple Tokens in same region. If no such region is possible then the Token stays where it is.
- If multiple tokens exist in same region this region still counts as 1 Location and can be trapped by 1 normal Trap Jaw.
- Only the Evil Player has the choice to leave the Token where it is. Good player must move it to another region if possible following the Nudging Token rule above.

==============================

Now here is how it went in the test game for each of the regions:
(19): 5 (good player) moved token to 12
(18 ): 3 (Evil Player) moves it to 14 (2 tokens in there now)

Now next roll may really narrow it down, if evil takes it or it stays where it is, then the Evil side will have 2 jaws and only 3 regions to trap - 67% chance and I think even 100% chance to a Successful Trap as the resting one is not likely now for Good Player to Play, and certainly not an option for the Evil Player to Trap.

(14): 1 (Wow, Evil Player!!) and he of course leaves it where it is!

After wandering blindly in the woods, FSP ended up at:

(12),13,(14) = O13,12,14 (Only one Nazgul at 13 as he's just forming the Trap but not gonna target it as True Location)

Reveal - LKP 12 - rolls 2 - 1 Burden and SBG Battle (According to the Successful Trap Roll Chart, RB must take a Burden and Fight a battle against Nazguls)

Now is not the time for an SBG report, but now a Normal table top battle is played with FSP 4 Hobbits against 3 Nazguls around them - max limit against only Hobbits FSP - trying to kill the RB. Good player choose to fight in region 12 as his destination. We picked the "Flight to the Ferry" Scenario from GW web site to play. The hunt is on...run Frodo run!!!
A quick report: The battle went well for the FSP, Frodo managed to Escape though Sam and Merry fell in Battle (Not thoroughly killed yet).
Remember the Special Rule "Bless You Laddy!". Sam and Merry can return to join FSP on the strategic map after battle as they were just injured or fell out of the battle and healed afterwards. Each FSP member can do this as many times as he has wounds. So now Merry can re-join but he can't come back if he fell in battle again, while Sam still has one more chance (Keep Track of those Fate Picks).

LKP 12 (Only 2 Steps away from Bree, the Major Destination for this Stage to Hire Aragorn and Unlock the next Stage and in time too - Time Attack for "Stage 1" is 8 Turns. The Only Problem that this is so clear that Nazguls will sure try to seal this road at least to put one more Burden on RB)

Image[/spoiler]

[h2][center][h3]Turn 7[/h3][/center][/h2]
[spoiler](20),22 = O12,20

Revealed - LKP 20 - rolled 5 - 1 Burden (they were revealed so reset FSP turns to start at the first again)

Image[/spoiler]

[h2][center][h3]Turn 8[/h3][/center][/h2]
[spoiler](33),23 = O20,33 (FSP keeps runnig for their destination and Nazguls are gaining on them)

Revealed - LKP 33 (Bree) - rolled 1 :( 
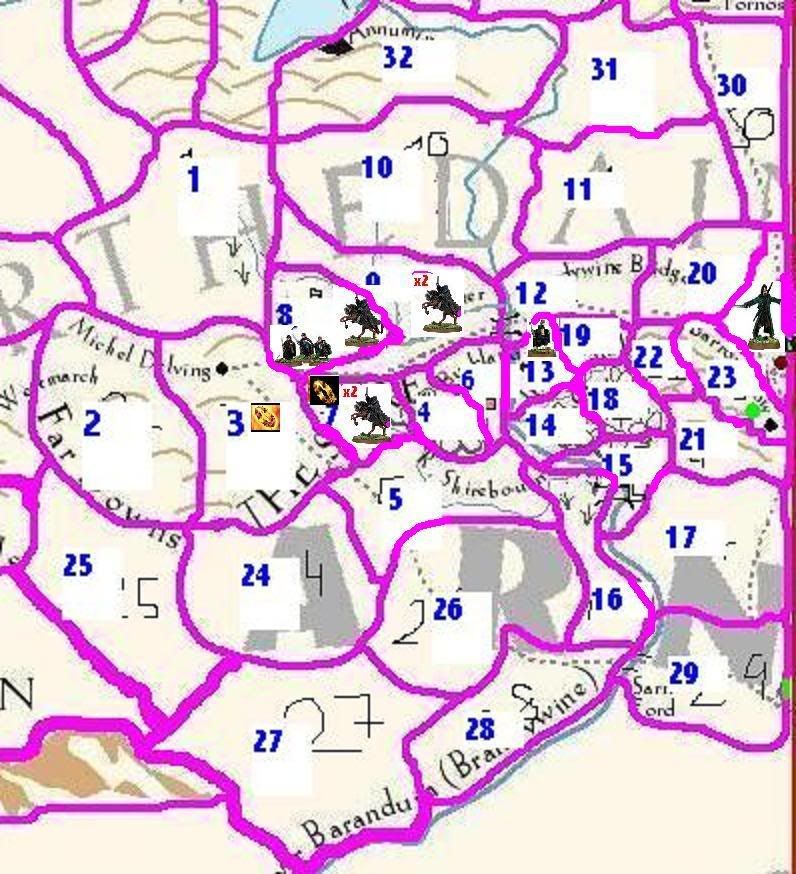
(Arrrrrgh, Failed to avoid the Burden - If FSP would have rolled 6 in a Freeps City he would have completely avoided the Burden. Even 4-5 would allow another FSP model to take the Burden instead of RB. But Now unfortunately RB has to take the Burden and gets Corrupted. A battle should take place too on that roll, but no need for it now as Shadow already took what he thinks is his and runs back to his Master!!)

Image[/spoiler]

[h2][center][h3]"The age of men is over, the time of the Orc has come!"[/h3][/center][/h2]
[spoiler]Game over!! and Shadow side won the game, Nazguls managed to Hunt RB, Corrupt him and win back the One Ring for their Master. Shadow covered all Middle Earth.

Sadly enough, it was down to one roll when Lady Luck decided to give victory to Shadow side. Even Lady Averages hasn't even shown her face.

Ok, but let's Imagine If FSP would have managed to escape this unfortunate incident and met their luck. If they've rolled 6 they would have entered Bree unharmed, but what if they rolled a 4 for instance in that last roll:

In such case 1 burden must be taken on anyone of the FSP inc. RB.
RB can't take no more Burdens or he would be corrupted according to one Stage game burdens limits ("War of The Ring" section)

FSP would have entered Bree. Remember that Revealing occurs in Test Trap Phase, while Declaring occurs in Declare FSP phase where new FSP member can join. So though FSP is now Revealed in Bree, Aragorn can't Join in till next Phase begins. Means that the Burden can only be assigned on one of the 4 Hobbits. Good player chose to assign it on Merry, who fell in battle once and with his 1 Fate Pick left he may be the first to be removed from the game if he falls again in battle.

Declare FSP Phase - Aragorn Joins FSP and FSP declares unlocking Stage 2 (Stage 1: Past, Stage 2: Current, Stage 3: Active)

Wouldn't that be a happy ending... But aint that the beauty of the game, anyone can win!!! :wink: [/spoiler]

[h2][center][h3]Conclusion[/h3][/center][/h2]
[spoiler]- It was a successful test that made me change some of the rules to adjust each side's chances and keep a thrilling game on.
- It was a close Game. One more Burden and Ring Bearer would have been Corrupted.
- Turn 6 was really very exciting one and a sharp turn of events in the game. The "Lost Chart" seems to be working fine. May be it needs to be more random but I think it worked ok in this game. I think I'll add it to the Game Play rules as it is for now. Let me know what you think.

Now I hope you have a better understanding of the game's nature. Not all it's mechanics though.
Just imagine now that Evil Side has cards to aid him in his Hunt for the One Ring...cards to eleminate one of the FSP tokens, to assign Burdens to FSP because Nazgul is near, deployment cards to hire agents in Bree to help in Traps or may be Barrow-wights, or to Trap only one position on the FSP second turn to have a Successful Trap...
Or if Good Side has cards to make him advance one of his tokens 2 regions away instead of 1, to deploy Heros to Help (Goldor, Tom Bombadil, Farmer Magot...), or to better avoid Burden roll chance...

All that besides the battle that may go on the whole map if you play the full game or more than one Stage. The cards to deploy Evil Nations forces to get ready to wipe out man from ME, and Good Nations to fight an unavoidable desperate battle. Nations trying to increase it's control Zone to move their army to secure better positions and capture key ones from opponents...Unlimited variations, strategies and tactics mix you can make that'll make every game is different than the other.[/spoiler]

Finally, I hope you enjoyed this test game and it gave you a better understanding of the Game System. So, let me see your C&C...


Last edited by MuslimRohirrim on Tue Sep 30, 2008 9:20 pm, edited 9 times in total.
Top
  Profile  
Reply with quote  
 Post subject:
PostPosted: Thu Sep 11, 2008 1:09 pm 
Elven Warrior
Elven Warrior
User avatar
Offline

Joined: Fri Oct 20, 2006 6:54 pm
Posts: 973
Location: Wirral
Hey again! :)

Okay, a few points. I didn't really understand your post on the 9th of September. The rules in my opinion were a little hard to understand. Maybe it was just the names 'FSP' etc, I'm sure if you referred to these in there full name, it would be easier to grasp.

The battle report/campaign report was actually a lot easier to understand than your description of the rules. It looks like a lot of fun to recreate the events of the book. Evil seemed a little overpowered, being able to position the wraiths in a line, especially towards the end. Look at turn 8 map - the wraiths are surrounding Bree, preventing the Hobbits from entering. Perhaps make the map larger so that there are more possible entrances into Bree, the Hobbits should be able to slip by. Can the Hobbits enter a region with a Wraith in and not be detected?

The false positions is a nice touch, reminds me of 'Battle Ships', the game that is. I think you should make this rule for the Ringwraiths as although they are on horseback, they won't be riding all the time, they also need to search.

- When moving the Nazgul (in Stage 1) roll a dice to determine how many regions they may move this turn

1-3: The Nazgul are thoroughly searching the area, they may move 1 region this turn.

4-6: The Nazgul are charging through this land, they may move 2 regions this turn.


That way it gives the Hobbits more of a chance, after all you don't want the game ending so early right? :wink:

Quick question about the deployment, are they deployed in those regions automatically or can the players decide? If they can decide what restrictions are there for both players?

Could you define a few of the terms and how they work please, thanks

Trap
Tokens

How do they work? How many do you get? And what factors affect how many you get? I noticed the number of Tokens increased and later decreased, why was that?

Looking at this I think it may be better to split the stages up into smaller categories.

Stage 1 could be from getting the Hobbits to Bree,
stage 2 from Bree to Rivendell,
stage 3 from Rivendell through Moria,
stage 4 from Moria to Lorien,
stage 5 from Lorien to Amon Hen,

and so on

But its looking much better mate, keep it up :)

_________________
The Southern Fiefdoms: http://www.one-ring.co.uk/viewtopic.php?f=5&t=21928
Top
  Profile  
Reply with quote  
 Post subject:
PostPosted: Thu Sep 11, 2008 1:42 pm 
Kinsman
Kinsman
Offline

Joined: Sun May 25, 2008 6:07 pm
Posts: 112
looking amazing bu evil seems overpowerd, remember that this is only a smal part and that evil shouldn't be able (unles good plays terrible) to winn so earlly.

_________________
live good and you will be rewarded
live bad and you will have fun
Top
  Profile  
Reply with quote  
 Post subject:
PostPosted: Thu Sep 11, 2008 6:42 pm 
Craftsman
Craftsman
User avatar
Offline

Joined: Tue May 27, 2008 7:19 am
Posts: 311
lorderkenbrand wrote:
Hey again! :)

Okay, a few points. I didn't really understand your post on the 9th of September. The rules in my opinion were a little hard to understand. Maybe it was just the names 'FSP' etc, I'm sure if you referred to these in there full name, it would be easier to grasp.


Hey, my great supporter!! :)

You may be right, sometimes I do think things are clear when they're not. So keep letting me know where do I lose you. BTW FSP means Fellowship :P :lol:
I'll work on those as soon as possible.

lorderkenbrand wrote:
Could you define a few of the terms and how they work please, thanks

Trap
Tokens

How do they work? How many do you get? And what factors affect how many you get? I noticed the number of Tokens increased and later decreased, why was that?


Let me start with this one. Seems "FSP" effect was beyond my worst thoughts. You can find the details in the "FSP hidden movement" (Translation: Fellowship Hidden Movement) :lol:

================
In short:

Fellowship move in steps of 2 turns each. First turn they have 2 tokens to place (only one of them can be True Location). Second turn each of the first 2 tokens may split to 2 tokens for a total of 4 tokens (only 2 of them may be True Locations).

Nazguls can trap only one token of the 2 in the first turn, and 2 tokens of the 4 in the second one. a 50% chance.

To trap the Fellowship Nazguls must place 1 Nazgul at the Last Known Position (where the Fellowship is at now), and 2 Nazguls at each of the True Location Tokens. They have max of 3 Nazguls to Trap FSP in the First Turn and max of 5 Nazguls at second Turn.

=================

But this is the Core mechanic of the game so I'll try to quickly go through it in more details. I'll Start with Fellowship then move to Nazguls:

Fellowship moves in 2 turns pattern. If they're not revealed during these 2 turns they must declare their position as the new "Last Known Position" (LKP) by the end of second turn.

On the first turn they can indicate 2 possible regions to move to, and put one faced down Movement Token in each of them. Only one of those token can carry the True Location mark (Faced down of course).

On second Fellowship (FSP) movement turn FSP may split each of the 2 Tokens from First Turn into 2 Tokens to a total of 4. Only 2 of those 4 can be True Locations (Carry the faced down True Location mark).

Now Nazguls:

They need to Trap all True Location Tokens. That's by placing 1 Nazgul at the Last Known Position (LKP), and 2 Nazguls at each of the True Location Tokens to form a Successful Trap.

On first Fellowship Movement Turn, a max of 3 Nazguls can be envolved in a Trap. In short only 1 of the 2 Movement Token to trap and Evil Side must decide which one.

On Second Fellowship Movement Turn, a max of 5 Nazguls can be envolved so 2 of the 4 Movement Tokens can be Trapped.

You see it's almost a 50% chance to catch FSP. What narrows it down is FSP options and Evil player's guess of most probable places to go.

Do you think you got it yet? Let's put it to test and look at first 2 turns in the test game post (One pattern of FSP Movement):

Turn 1: (First FSP Movement) they have 2 tokens to assign. They assigned them to regions 3 and 7. Evil side only sees an identical face down token and he knows he can trap only one, so he must decide which one to trap with his max 3 Nazguls. Actually he had no choice but to Trap 7 (One Nazgul at LKP, and 2 at the Token), because 3 was out of reach.
He did but it was not the True Location and the FSP slipped from their grip this turn.

Turn 2: (Second FSP Movement) they can split each token into 2 adjacent regions. so they split region 3 into regions 24 and 5, and split region 7 into regions 4 and 9. Evil side sees 4 face down tokens only 2 of which are True and he must decide which 2 to trap. He decided to use his max 5 Nazguls to trap 4 and 9 (One Nazgul at LKP, and 2 at each Token of the two). He managed to trap only 1 of the True Locations (region 4), so this is not a Successful Trap.

Now at the end of FSP's first pattern (2 Turns Movement) they managed to escape the Nazguls and have to declare their new position (one of the last True Location Tokens). Nazguls may have failed to Trap FSP but managed to drive them away from their path. As one of the Locations were Trapped (region 4), the Fellowship (FSP) has no choice but to declare their new position at the other True Location Token in region 24.

So next turn you'll notice that FSP are at region 24 (Last Known Position - LKP), and another pattern will start next turn with another FSP first turn starting from region 24.

This 2 turns pattern will be repeated through out FSP movement unless they are trapped at FSP First Movement Turn.

If they were revealed at the FSP fisrt turn as it's the case in Turn 7, then they should start from the beginning as they did in turn 8 with another FSP first turn.

I hope that clears things a bit for you and let me know if you still have more questions about it.
Time is too tight now, so I'll answer more of your questions later.


Last edited by MuslimRohirrim on Thu Sep 11, 2008 11:22 pm, edited 1 time in total.
Top
  Profile  
Reply with quote  
 Post subject:
PostPosted: Thu Sep 11, 2008 9:10 pm 
Craftsman
Craftsman
User avatar
Offline

Joined: Tue May 27, 2008 7:19 am
Posts: 311
joris267 wrote:
looking amazing bu evil seems overpowerd, remember that this is only a smal part and that evil shouldn't be able (unles good plays terrible) to winn so earlly.


Thanks for the comment. I just want to point out that this test game is only on a Separate one Stage of the game. If you played the Whole game then Ring Bearer (RB) should have 10 Burdens not only 3.

The full game is 4 Stages game. But it's also designed that you can play as many Stages as you want. For every Stage you eleminate from the full game to suite your Game you eleminate 2 Burdens from Ring Bearer and also from each of the Fellowship Members (to a min of 1). So eleminating 3 Stages out of 4 to play only one Stage as I've done, would eleminate 6 Burdens out of the normal 10 for the RB to end up with 3. It helps to make the game Challenging.

To read more about playing a single Stage you can refer to the "What you need to start playing" section of the Game Play post.

Besides that, this test game was just testing FSP movement as core part of the game, but when the game is complete there will be different ways to heal Burdens, avoid burdens, escape traps in the game like effects of Ring Cards, or Staying in Rivendell for instance. And remember that there is a chance in the Success Trap roll that the Burden may go to one of the other Fellowship members not the Ring Bearer.

Let me know what you think of that.
Top
  Profile  
Reply with quote  
 Post subject:
PostPosted: Thu Sep 11, 2008 10:24 pm 
Craftsman
Craftsman
User avatar
Offline

Joined: Tue May 27, 2008 7:19 am
Posts: 311
lorderkenbrand wrote:
The battle report/campaign report was actually a lot easier to understand than your description of the rules. It looks like a lot of fun to recreate the events of the book. Evil seemed a little overpowered, being able to position the wraiths in a line, especially towards the end. Look at turn 8 map - the wraiths are surrounding Bree, preventing the Hobbits from entering. Perhaps make the map larger so that there are more possible entrances into Bree, the Hobbits should be able to slip by. Can the Hobbits enter a region with a Wraith in and not be detected?


Ok, Turn 8 you say.

Let's have a closer look at the choices of both sides.

Let's think like a Nazgul: :twisted:

This is the Fellowship's First Movement Turn (2 face down tokens) and we can only trap one token. We only have 1 chance to Trap those little magots. They'll sure go for Bree and we can't risk allowing them there.

So they can't risk trapping anything but Bree. They are down to 1 choice. Almost a "force move" as they say in chess. There best choice I think.

Now Let's take the FSP side for a sec:

We have a decision to make and couple of choices to choose from:
- Insist to unlock the next Stage in time (Time attack is 8 turns for Stage 1) and win a 15VP Bonus (Greedy Choice I would say). Place our True Location Token in Bree this turn. We'll be risking an almost certain Successful Nazgul Trap, then depend on the 33% chance in the Success Trap roll to escape the Burden. (This choice they did pick in the test game)
- Or make a feint and stay low this turn hoping for a better chance on the Second FSP Movement Turn with a 4 Tokens to place.

Let's study this last choice. Imagine if the FSP reversed their Tokens Locations in that last turn. So that the True Location would be at region 23. Now lord erkenbrand asked "Can the Hobbits enter a region with a Wraith in and not be detected?" Is the City really surrounded?! no sir it is not. Those Nazguls at 23 are just waiting for next move, and may be some cards effects when we later come to Cards and Cards Rules. Remember, Nazguls can only trap one Token at the First FSP Movement, which they decided to be on Bree. So only the 2 Nazguls in Bree are envolved in the Trap. If there is more NON-ENVOLVED Nazguls at the other Token Location, they are not Trapping party. May be they're passing fast enough, bending their thoughts on something far ahead that they missed the FSP sneaking around the trees.

So, If it worked this way, which is most probably will, then FSP will be trying to enter Bree on Turn 9, with 4 Tokens at hand to spread around and 5 Nazguls to fight this time that may attempt to Trap 2 Tokens of them.

Turn 9:

33, 20, 22, 21 = If you were playing Nazguls where would you Trap????

Let me make it easier for you. 33 is a must (same as last turn), you know I am going there. But are you that certain of which other Token to Trap????? I suspect!!
Now I have 2 chances out of 3 that I'll enter "Bree for Free" :lol: . 67% chance is not bad at all. Ah, and even if you guessed it right, we still have a 33% chance in the Success Trap roll that I'll totally escape the Burden and put it on one of the other Fellowship members. In one Stage Game, I'll sure lose this Brave Hobbit to Shadow, but I'll win the game :P . I bet Nazguls who are the ones needing balancing help now.

One more clarification, can Fellowship declare in Bree while it's Trapped??
Usually you can't Declare Fellowship at a Trapped True Location (as in Turn 2 of the test game), but there is an exception if it's a Free People's City. Review "Fellowship (FSP) hidden Movement and Nazgul Trap" section under "FSP 2 turns movement"-"Turn 2", and also under "Declaring Fellowship".

Now you both were asking about chances of Fellowship against Nazguls and their chances to slip by Nazguls. I guess I've answered that.

Still very interested in what you think about it. I really like to discuss this point with you because in my opinion the balance of the game is the most important thing to make the game enjoyable. So keep it coming guys.
Top
  Profile  
Reply with quote  
 Post subject:
PostPosted: Fri Sep 12, 2008 3:16 pm 
Craftsman
Craftsman
User avatar
Offline

Joined: Tue May 27, 2008 7:19 am
Posts: 311
lorderkenbrand wrote:
Quick question about the deployment, are they deployed in those regions automatically or can the players decide? If they can decide what restrictions are there for both players?


Ok, First remember that the "War of The Ring" is only a part of the game. It just happend that we test it alone in this game.

The game is more than just this race. Each side can have 1 or more Nation to fight with. It can be multiplayer game where each player controlling a Nation or more and one of the Good Players can be responsible of Fellowship movement, and one of the Shadow Players can be responsible of Nazguls.

At the beginning of the game Fellowship and Nazguls deployment will be fixed as in this test game (rest of the Nazguls will be deployed in Stage 2). But for the Nations it will be different. Every Nation will have certain amount of points to be deployed within its controlled borders as controlling player wishes with some special rules.

In next Game Play post I'll go through Initial Deployment along with Cards play and Time Attack rules, but as we started to grap things together let's take it one step at a time from this point on.

lorderkenbrand wrote:
The false positions is a nice touch, reminds me of 'Battle Ships', the game that is. I think you should make this rule for the Ringwraiths as although they are on horseback, they won't be riding all the time, they also need to search.

- When moving the Nazgul (in Stage 1) roll a dice to determine how many regions they may move this turn

1-3: The Nazgul are thoroughly searching the area, they may move 1 region this turn.

4-6: The Nazgul are charging through this land, they may move 2 regions this turn.


That way it gives the Hobbits more of a chance, after all you don't want the game ending so early right? :wink:


Glad you liked the Hidden Movement mechanic. I gave some thoughts to your suggestions of providing more ways into Bree and Nazgul Movement Chart. I replayed the same previous test game with the Nazguls Movement Chart you sugessted. The game went almost the same till Turn 5 though Nazguls had to move only 1 region sometimes. From Turn 6 on the Game started to change a bit. Also please note that I edited the Lost Chart rules just to make it clearer as you may notice in Turn 6 of the previuos test game.

Here is how the second test game went (no images, sorry). And I can't wait for everybody to let me know which one he thinks more balanced. I'll let you know what I think after I get some feed-back. So here it is:

=======================
Turn 1: (3),7 = (Nazguls roll 5) same turn
Turn 2: (24),5,(4),9 = (Nazguls roll 1) same turn
Turn 3: (26),5 = (Nazguls roll 5) same turn
Turn 4: 27,(28 ),4,(6) = (Nazguls roll 5) same turn
Turn 5: 9,(13) = (Nazguls roll 4) same turn


Turn 6: (19),(18 ),13,14
- Lost Rolls => (12),13,(14) = (Nazguls roll 3) 9,19(x2)....(17 stays where they are as they can only go quickly through Bombadil's territory but can't stay in - regions 15,21. You can review "Fellowship (FSP) Hidden Movement" secotion under "Trap Fellowship" for more details)

Fellowship Declares at 14

Turn 7: 19,(8 )
- Losr Rolls:
(19): rolled 6 - Token stays in 19
(8 ): rolled 5 - Good player's choice (can't stay in same region) - he chose to nudge it to 13 (He only has 13,14 and 19 to choose and he don't want to put all eggs in one basket, in the same time he want to keep closer to main road in case he wanted to take an easier way.)

Where are we??? 19,(13) = (Nazguls roll 2) 12,22(x2)......(17 still staying where they are waiting for a chance to cross Bombadil's territory)

Turn 8: 12,(22),(8 ),14
- Lost Rolls: (Woods, Mountains up or down , Hills and Bogs)
Evil player arranged them in following sequence to roll for: 22,8,14
(22): rolled 2 - Evil Player - He moved it to 12 (Now 22 is empty region 12 has 2 Tokens one of them is True - hush hush...evil side don't know which is which)
(8 ): rolled 5 - Good Player - He moved it to 22 (Now 8 is empty and a True Location Token is in 22 again)
(14): rolled 1 - Evil Player - He moved it to 13 (Now 14 is empty and 1 False Token in the LKP 13)

Where are we??? (12),(22),13 (if Nazguls got 2 Moves this turn it'll be a 100% chance of a Successful Trap) = (Nazguls roll 2!! bad luck!!) 13,12 (17 still staying where they are waiting for a chance to cross Bombadil's territory)

FSP Declares at 22

Turn 9: 20,(23)
- Lost Rolls: (Woods, Mountains , Hills and Bogs)
Only 23 to roll for as it's a Hills region.
(23): rolled 3 - Evil Player Nudges it to 20.

Where are we??? (20) (Both Tokens are at 20 now, it's only up to the Nazguls' roll to Trap them now) = (Nazguls roll 5!! heeeeya) 22, 20(x2), 23(x2)

FSP is revealed at 20 - Successful Trap roll 5 - RB takes 1 Burden.

Turn 10: 33,(30) (My Trick, we already broke the time limit for the Stage - 8 Turns) = (Nazguls roll 3) 20,33(x2) (the other 2 moved to 30 but they were declared as not envolved - Nazguls has 1 Token to Trap this turn)

Turn 11: (33),20,(11),30 = (Nazguls roll 5) 33,30 (hahahahaha, it worked!!!! I tricked him... - he said it was hard to pick 11 and go 2 spaces away from Bree which he defends, exactly what I thought you know!!!)

Game Ove, and Good Side managed to survive so far.
==========================

So, let me know what you think!
Top
  Profile  
Reply with quote  
 Post subject:
PostPosted: Mon Sep 22, 2008 11:19 am 
Craftsman
Craftsman
User avatar
Offline

Joined: Tue May 27, 2008 7:19 am
Posts: 311
Here I post the Stages 2 and 3 from the map divided into regions. I am planning to play a test game on those two Stages. That'll be a good chance to put many of the Mechanics and Game Play to test. Oh, and sorry for another long post. :wink:

The upcoming test game will envolve hunting the Fellowship as the first one did, but also will envolve Nations from both sides in for war. So now is the time when you'll get to bring your mighty army into play.

Click on the image to view and download.
Image


[h2][center]Map color codes and patterns[/center][/h2]
[spoiler]Pink lines: regions borders. movement can only be between numbered regions with shared border.
Teal dotted line: roads. You'll notice that staying on the road will mostly save time.
Teal line: rivers. they are not passable unless there are bridges/fords. Bridges/fords are represented by 2 black lines across the river line and between the 2 regions you can move between. To identify the Ford from the Bridgem the Ford will not be on a road line. Examples: you can't cross the river Hoarwell in the Ettenmoors north of Rivendel from region 317 to 319. but you can go round it's end from region 317 to 318 as they share a border. Also you can cross the river from 54 to 57 (Bridge), or from 269 to 270 through the Carrock island as it was shallow (Ford).
Brown: Mountains/Hills. Most Mountains are immpassable, but all hills are passable with some difficulity and you may possibly be lost (Lost Chart roll). Only the numbered regions on Mountains are considered to be passages. Examples of Passages are The Redhorn Passage over Caradhras at regions 262 and 263, and Moria at region 220. The dotted lines around such regions indicate if they are over/between mountains (Blue dotted) as it's the case with Redhorn passage, or subterranian (Purple dotted) as it's the case with Moria. (Note: Moria will have special mini map and subterranian regions will have special stacking rule)
Purple lines: Naztion's Control Zone. All regions within this zone are under this Naztion's full control at the beginning of the game.
Dark red: Those are of course Stages borders. You may notice that I have slightly adjusted the border between Stages 3 and 4.
Woods: Pattern like the one in region 3,4, or 260...
Marshes/Bogs: Pattern like the one in region 12, 13, 62, or 252...

I may have missed something so let me know if you still see something you don't understand and I'll add it here...

I am thinking of dividing the sea areas too for naval movements like corsair black sails fleet, may be later.

So, take a look at the map and let me know your impression.[/spoiler]

[h2][center]As for the game I'll highlight some starting points:[/center][/h2]
[spoiler]Mostly the following rules are trying to adjust the game to imply time elapsed since the beggining of the Journey as you may start your game at a later Stage. If you're playing your game starting at Stage 1, then don't apply Draw Decks and Control Zones Adjustments.

Endurance Points Adjustment:

Usually each Fellowship Member including the Ring Bearer starts a full game with X endurance points (so X burdens needed to corrupt him). But as you may choose to pick certain Stages to play(not a full map game) so for each Stage you eleminate, you subtract 2 endurance points from each to a min of 1. For instance Frodo usually starts a full game with 9 endurance points, so now we'll only play 2 Stages out of 4, we'll subtract 2 points for each of the eleminated stages to a total of 4 poits subtracted and so Frodo will start our test game with only 5 endurance points.

Victory Points Adjustment:

As mentioned in the Game Objectives section in the Game Mechanic Post at the top of this thread, one of the ways you can win a full game is by collecting enough Victory Points (VP). 300+ VP to be precise as mentioned in the End Phase of the Game Play post, under Victory Point. But if you decide not to play a full game then for each Stage you eleminate from your game you subtract 75 VP from this objective. Example: In our test game we play only 2 out of Full Game (4 Stages), so for the 2 eleminated Stages you subtract 75 points each for a total of 150 points out. Now you may try to collect 150 VP to win the game.

Fate Picks Adjustment:
In any non full game, each Fellowship Companion has only 1 time to cheat death after battles (not as many times as his wounds as mentioned in Game Play rules for a full game).

Draw Decks Adjustment:

Also after all decks are shuffled and placed, for each eleminated Stage from the full game dicard 3 Ring Cards and 7 Political Cards from the top of the proper deck before first hand drawing. Those discarded cards are discarded normally to discarding pile of each card type and they'll get into play if reshuffled again into the proper drawing deck after it gets empty. So for instance in our test game we eleminated 2 Stages to play only 2, so we have to discard 6 Ring Cards and 14 Political Cards.

Control Zones Adjustments:

Also for each eleminated Stage, each side gets a +1 expand region for each Stage in play to be assigned at the beggining of the game immediately after the starting hand is drawn. We'll eleminate 2 Stages in our test game so in each of the remaining 2 Stages each side can expand Nations' Control Zones by 2 regions in each of the remaining Stages. Example: In our test game we get +2 regions in each Stage, so if Evil Side plays Isengard in Stage 3, and Mordor and Harad in Stage 4, then you can expand Isengard's Zone by 2 regions, and also expand either Mordor's or Harad's by 2 regions or divid regions between them in any way you want respecting the expaning rules.[/spoiler]

[h2][center]Initial Deployment for Starting at Stage 2:[/center][/h2]
[spoiler]Fellowship's entrance point:

In a full game, Fellowship can cross into new Stage and unlock it by declaring at any region touching the new Stage's border and cross the border to any possible region. But as long as the Stage you start your game at is not Stage 1 and not successive to another region in the same game so we have to identify at which point the Fellowship has entered to start the game from. Now for example we'll start at Stage 2 in our test game, so the general rule is to assume the atmosphere of the Books/Movies and that means Fellowship entrance point is Bree so they can deploy at enter this Stage and deploy at any region that share a border with Bree. Namely regions 1,2 or 3. We don't know yet as it will be Good Side player's choice. Though you can alter that to make a different flavor and variation to your game.

Nazgul's Deployment:

Nazguls are always deployed first. If you are starting at Stage 1, then now you know you have a specific deployment for them same as previous test game. The 5 Nazguls followin Fellowship from Stage 1 into Stage2 now to deploy first and can deploy in Bree or any of the 3 regions adjacent to it but only in Stage 1 and with max of 2 Nazguls per region. The 4 other Nazguls are deployed as follows: two of them at 327 and the other two at 63.

Armies Deployment:

Nation's armies (Points): If each Player chooses 1 Naztion to play with (His army list) then Evil Nation starts with 400 points to deploy before first hand drawing, and Good Nation starts with 200 points to deploy. They can roll to see who deploys first. Those Starting Points can be deployed and divided freely in any region within Nation's Control Zone. For each extra Nation for any of the sides Evil side gets 200 points more to divide between his Nations, while Good player gets 100 points more to divide between his Nations. No Nation can start play with less than 150 points deployed into it's controlled zone.[/spoiler]


Last edited by MuslimRohirrim on Tue Sep 30, 2008 10:10 pm, edited 4 times in total.
Top
  Profile  
Reply with quote  
 Post subject:
PostPosted: Fri Sep 26, 2008 2:13 pm 
Craftsman
Craftsman
User avatar
Offline

Joined: Tue May 27, 2008 7:19 am
Posts: 311
Me and my friend are goint to test this campaign through a 2 Stages game (not a full gmae), and so I shall try to walk you through setting up our game. Things are still under testing so we very much welcome your suggestions and ideas.

[h2][center]Game Preparation[/center][/h2]

[h2][center][h3]Participants:[/h3][/center][/h2]

[spoiler]
[h2]War of The Ring:[/h2]

9 Fellowship (FSP)
9 Nazguls (Usually Nazguls on the Strategic Map are considered to be on Steeds, while in battles are on foot. You may choose other scenarios to play when FSP are trapped into battle, as long as y players agree on them)

[h2]In Play Nations:[/h2]

Each side decides which Nation(s) he plans to play. Each side may consist of one or more Nation with one player controlling each/multiple/all Nations.

Stacking limits:

The standard stacking limits are identified in Stages section in Game Mechanics post. But of course everyone has different army collection 1000 points, so always see what's the biggest army each Nation can Conjure and pick the lowest one of them. Example: You play a 2 Nations game, one of the Nations can conjure up to 600 points army, while the other can conjure up to 800 points army so your highest army stacking limit should be 800 points or less. Then you can assign the other levels. As a general rule Level 3 will be the highest level and each level should be around half of the higher level. Stronghlod regions are an exception of stacking limit as they can hold up to around one and a half of the level 3 stacking limit. for instance if your level 3 stacking limit is 800 then Stronghold region can hold up to around 1200 points. One limitation though for Strongholds, no more than level 3 army limit of one side can be behind fortifications. The rest should fight in battle field in front of the fortifications, start from certain deployment area, or work as reinforcement.

Our Test Game:

- We decided to play Rohan vs Isengard game. We're both using my collection. The least total points of the two Nations I have is for Rohan with about 600 points right now. So our Level 3 stacking limit will be 600 for this game. Level 2 will be 400, and level 1 will be 250. Not a very big game, but it is a test game after all.

What about all the other Nations on the Strategic Map?

- They don't have any Control Zones
- For the sake of Victory Points, all Cities and Stronghold of these Nations are still available for capturing as a one region Nation but they are considered to be Passive Nations (see following section for rules). Multiple Cities/Stronghols of the same Nation may exist separately at this point.

[h2]Passive Nation:[/h2]

A Passive Nation is the Nation that's not currently In Play.

Friendly Nations:

Friendly Nations then are responsible of defending them. So, Friendly armies can deploy points in them to help defending them if they should be attacked, but can never move out of them as they are considered the last defending garrison and they're under direct order that the defenses have to hold.

As soon as any points deployed in such region it can also expand to fold in more regions and form a larger Control Zone. This Control Zone has the same rules as any other zone excpet that armies within the Control Zone can move only within this Control Zone, but never out of it. Other armies can move into that Region/Control Zone, but never out of it.

Foe Nations:

Foe Nations on the other hand will try to cature them for Victory Points. Foe army that manages to capture a region that contains no City/Stronghold from a Passive Nation's Control Zone, this region is considered freed and Control Zone shrinks out of it to become a Neutral region again.If a foe army should capture the City/Stronghold region, his side immediately gains the Victory Points resulting from this. If there are still free If the original owner could free it, the Victory Points are subtracted from the foe right after battle.

A foe army can Capture the City/Stronghold but can never expand out of it. He can deploy more points in there though, respecting the stacking limit and no movement or expanding rules.

In short, it is only a one way journey into the city and never out of it :).[/spoiler]

[h2][center][h3]Objectives:[/h3][/center][/h2]
[spoiler]Points Victory is 150 Vp as discussed in the previous post.
Major and Minor Victory conditions Review Stages 2 and 3 in "What you need to start playing" section in Game Play post. If a side acheives all his Major Victory conditions of both Stages successfully, it's a Major Victory for this side. If a side acheives any of the Minor Vectory conditions in either Stage, it's a Minor Victory for this side. Just note that if a condition is required in a Stage it should be acheived in the same Stage (e.g. In non full game, Stage 3 condition mentions capturing a Stronghold, which means a Stronghold in Stage 3). Also note that Emyn Muil target is at region 192, so Fellowship has a goal to Declare there.[/spoiler]

BTW. In case you haven't noticed, I edited the map in the previous post a little.
And for more soon...
Top
  Profile  
Reply with quote  
Display posts from previous:  Sort by  
Post new topic Reply to topic  [ 17 posts ] 

All times are UTC


Who is online

Users browsing this forum: No registered users and 95 guests


You cannot post new topics in this forum
You cannot reply to topics in this forum
You cannot edit your posts in this forum
You cannot delete your posts in this forum
You cannot post attachments in this forum

Search for:
Jump to: